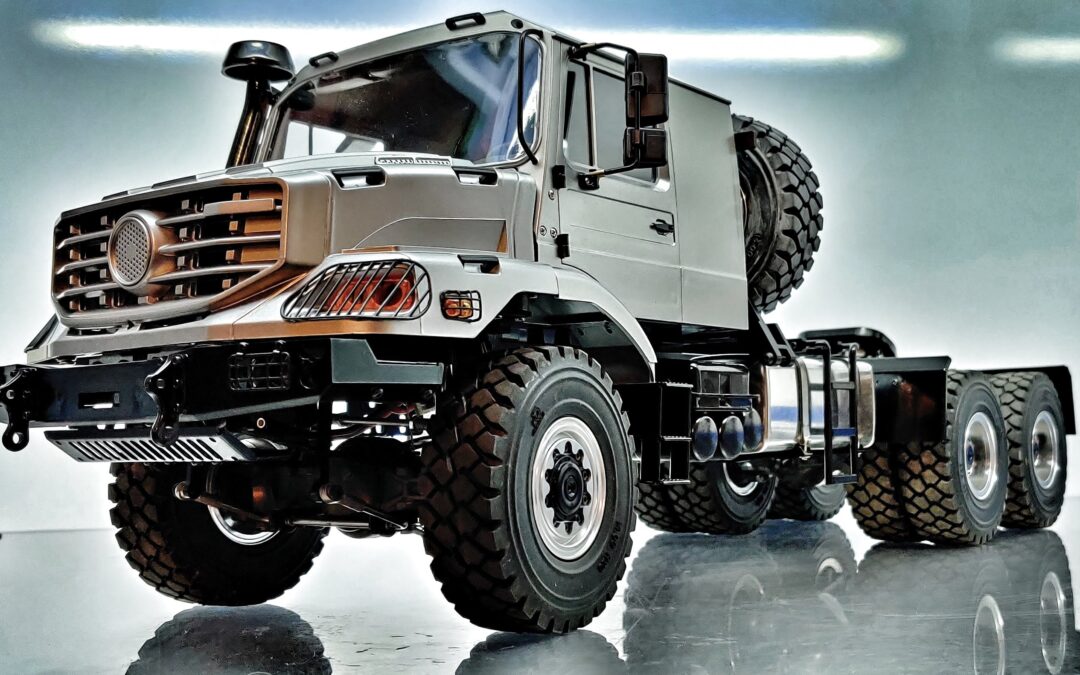
1/14 Mercedes-Benz ZETROS 6×6 Truck
An RC Heavy Hauler!
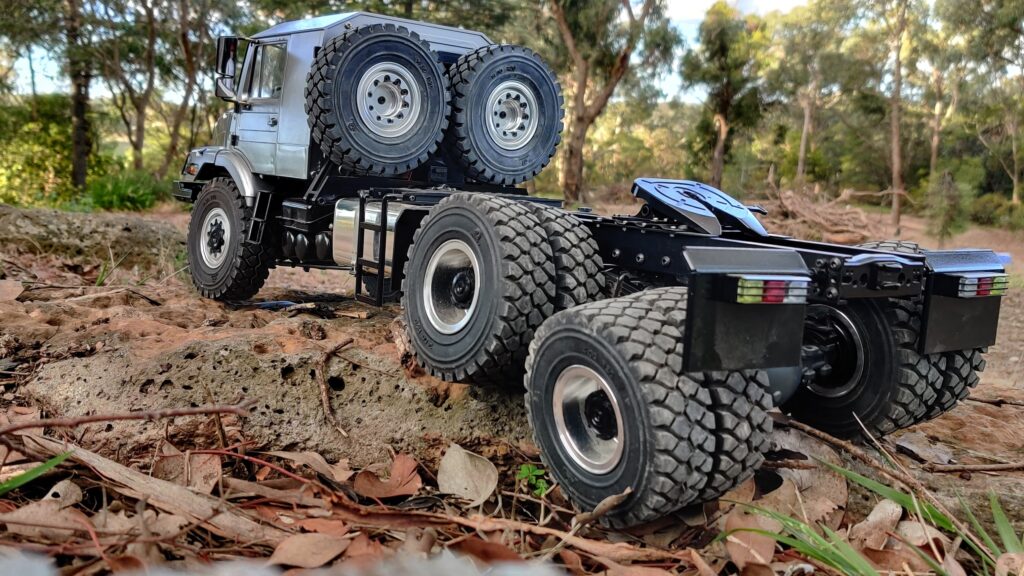
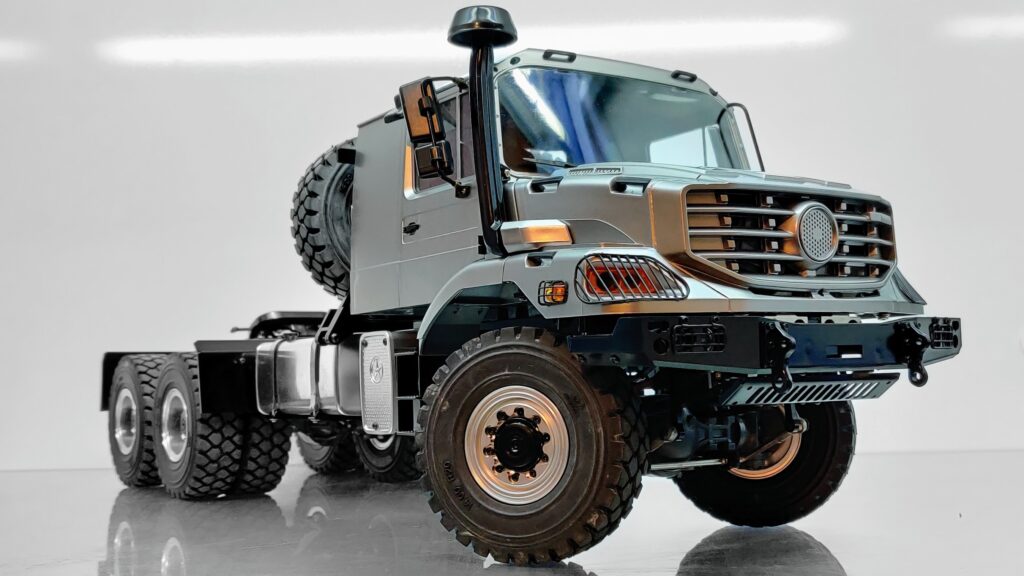
This is the 1/14 scale Mercedes-Benz ZETROS 6×6 truck with remote-locking diffs and two-speed transmission. It might be smaller than the real thing but don’t lets its size fool you: ‘heavy duty’ is its middle name!

A 6000mAh 3S LiPo Gives This Rig an Hour Runtime!
A Truck of Many Names
It’s sold under a few names: JD Models, JDM, JD Concepts, Team Raffee and RC4WD. Regardless of badge, this is a 1/14 scale model of the Mercedes-Benz Zetros 6×6 truck. The Zetros is made in 4×4 and 6×6. Occasionally you’ll find it in 6×4 configuration and there are even a handful of 8x8s out there. The 4×4 variant is most commonly seen in 1/1 scale and the 6×6 isn’t far behind. You might think of the Zetros as the offroad answer to Mercedes-Benz’s Actros, a very capable on-road workhorse.
We sourced ours from Hong Kong, care of a small company called ‘HIGHWAY TOY Store’. We’re not sponsored but they have been excellent in both shipping and after-sales support for the numerous vehicles we’ve bought from them. Our unit came well packed and communication was good throughout the transaction. It sells on AsiaTees under the Team Raffee badge. If you’d prefer to buy directly from the USA, once or twice a year RC4WD runs discount days and you may be able to nab a bargain on this truck then. Worth keeping an eye out!
Sizing Up
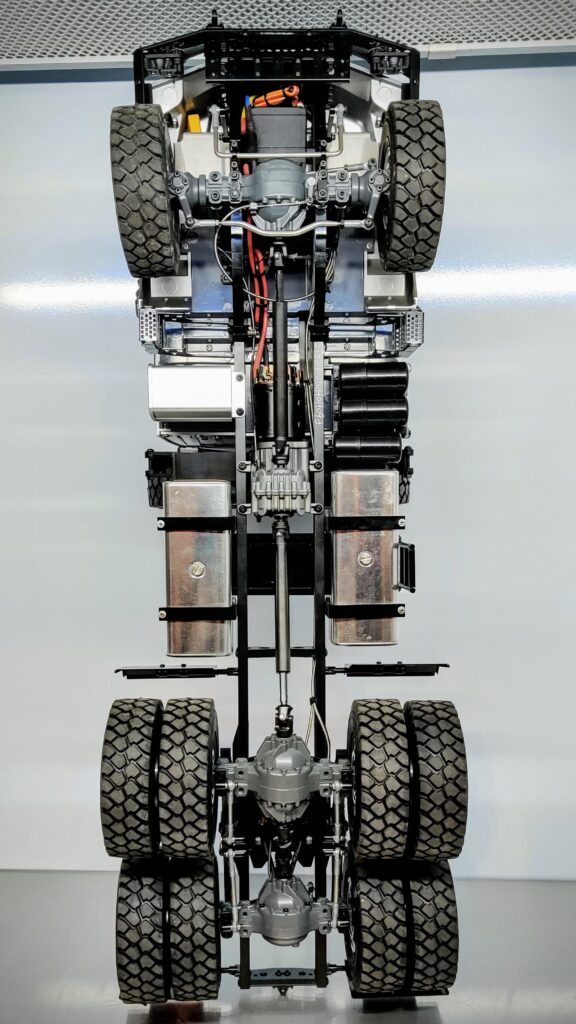
This model weighs 7.5kg (16.5lb). Its dimensions are 734mm long, 230mm wide and 273mm high. It has a front-rear wheelbase of 482mm with front-middle axle of 365mm and middle-to-rear axle of 115mm. First gear ratio is 1:64 and second gear ratio is 1:16.
What It Isn’t
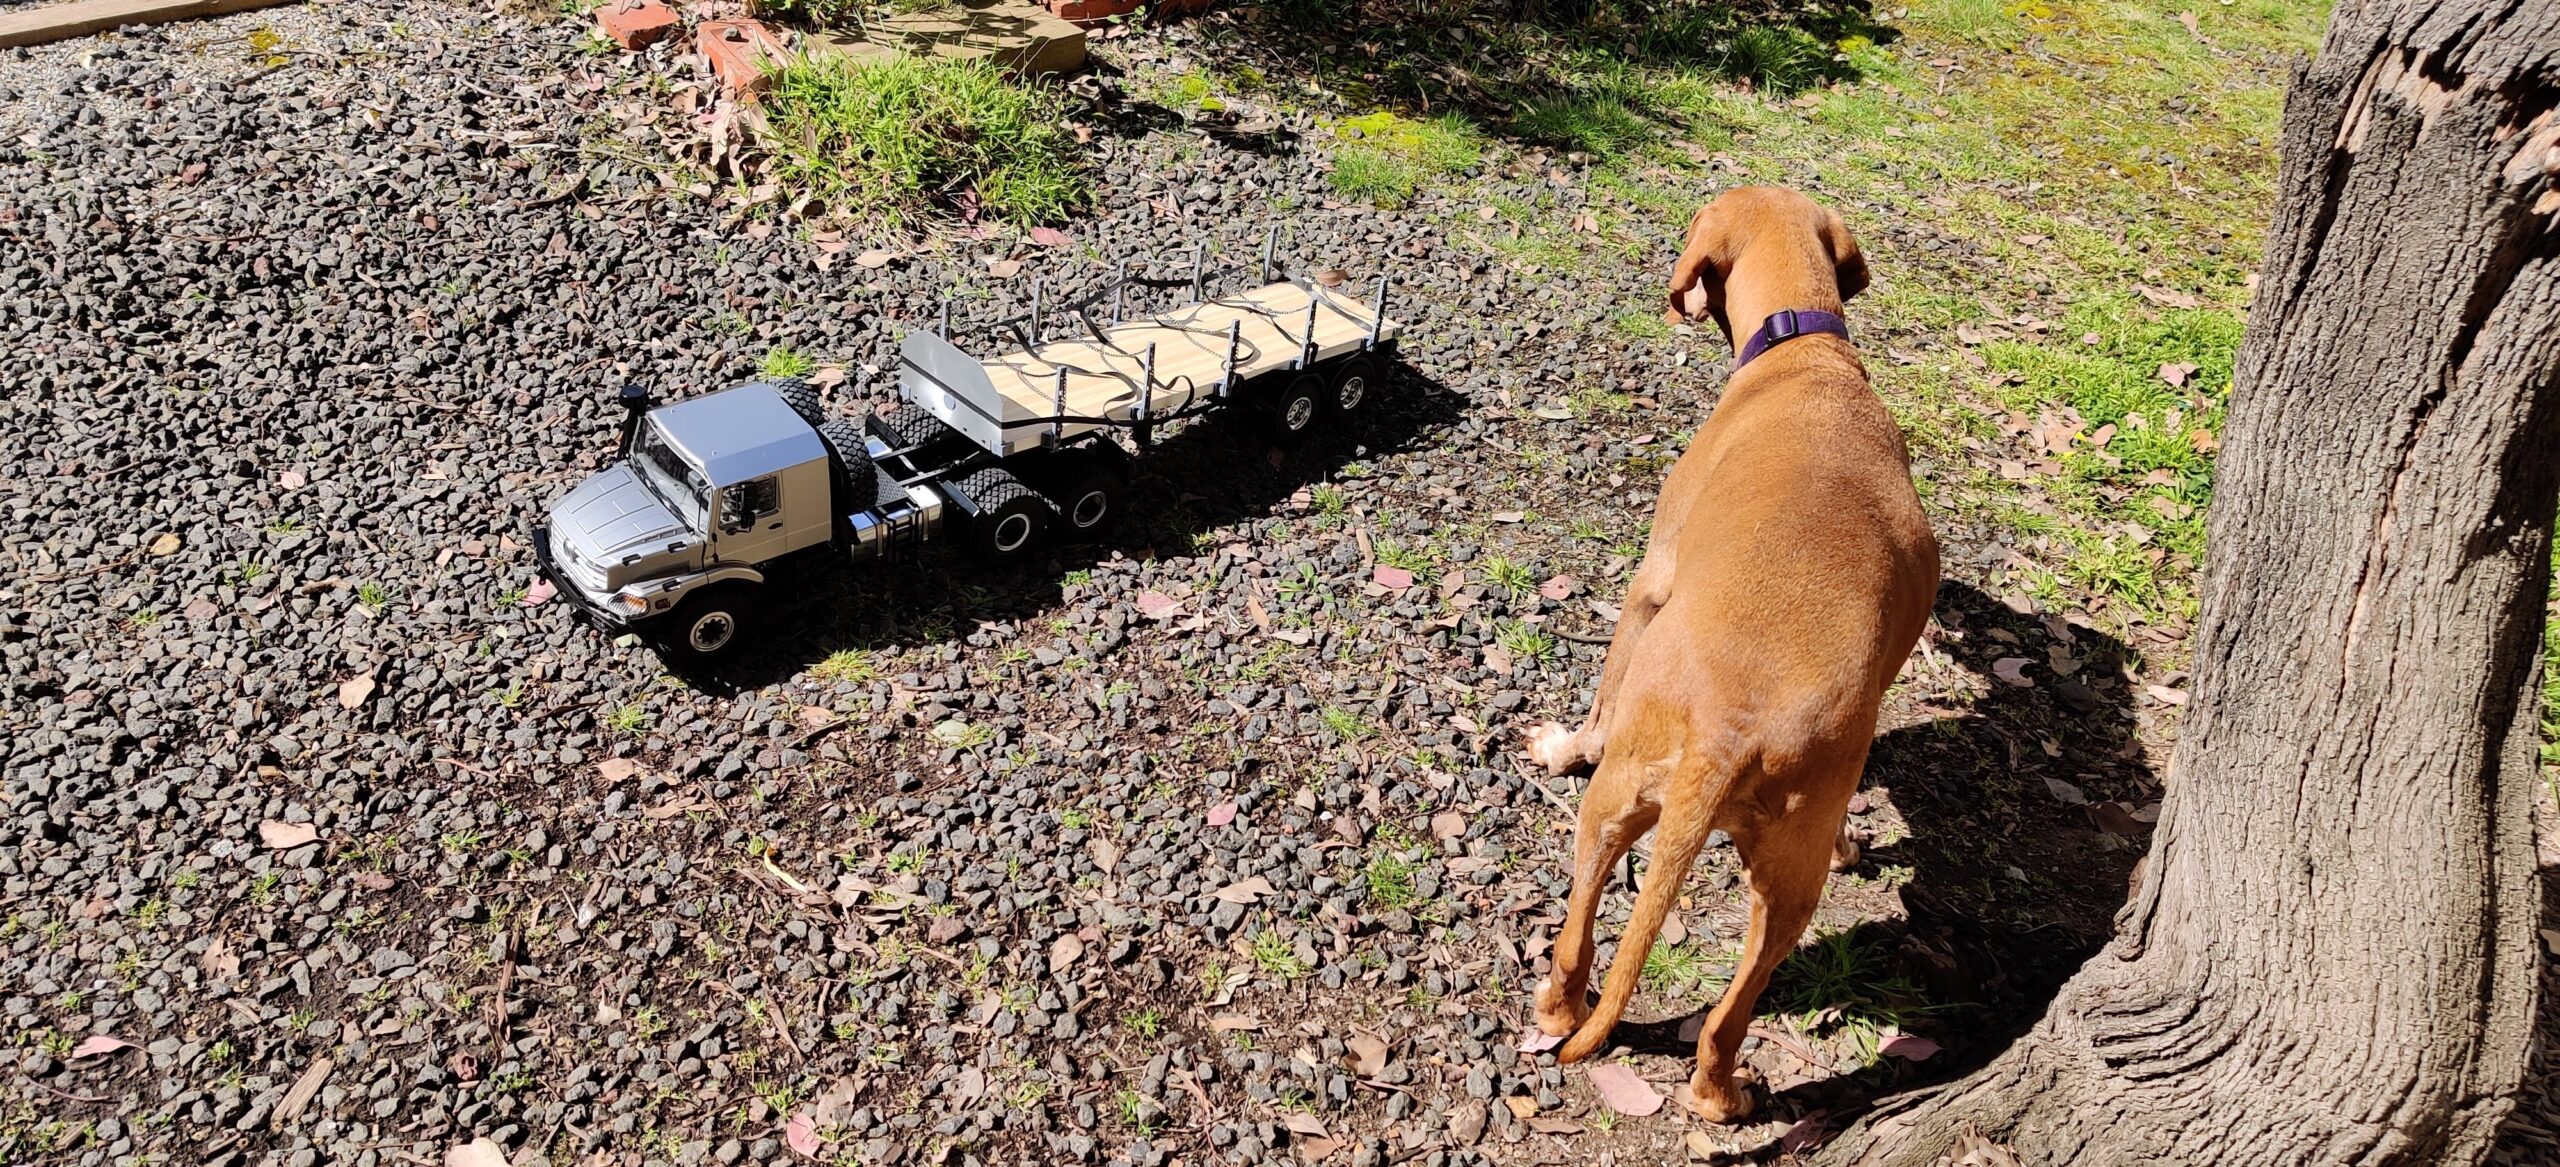
Despite having remote locking diffs and a heavy-duty drive train, the Zetros 6×6 Truck is not a rock crawler. The suspension is hefty and clearly capable of supporting significant weight. When loaded with enough weight on its hitch plate the rig will work nicely across uneven terrain. Physics works both ways though, so when running without a trailer the truck will be bumpy!
Another factor affecting the truck’s progress on uneven terrain is its clearance. Specifically, the lower-hanging componentry along the mid-area of the chassis. You’ve got a couple of hydraulic oil tanks (empty and unused in default configuration) and a ladder. Things can be removed, but the truck is just so pretty you’ll understandably probably want to keep it all attached. This means its break-over angle is poor. Again, this is not a rock crawler. With that expectation set up-front, the off-road performance this truck can deliver is actually quite good. More on that in a moment.
Ready To Run (Well, Not Quite)
The vehicle is advertised as being a RTR (Ready To Run) model. Experience dictating caution, we spent two evenings going over all the screws in our model to ensure everything was secured before running. Be aware that it needs thread lock applied to nearly all screws, wherever there’s metal thread. Many parts arrived only loosely attached, some nearly completely apart. But even if things are firmly installed, without thread lock it is inevitable that the screws will work themselves out over time.
Zetros 6×6 Truck Fix
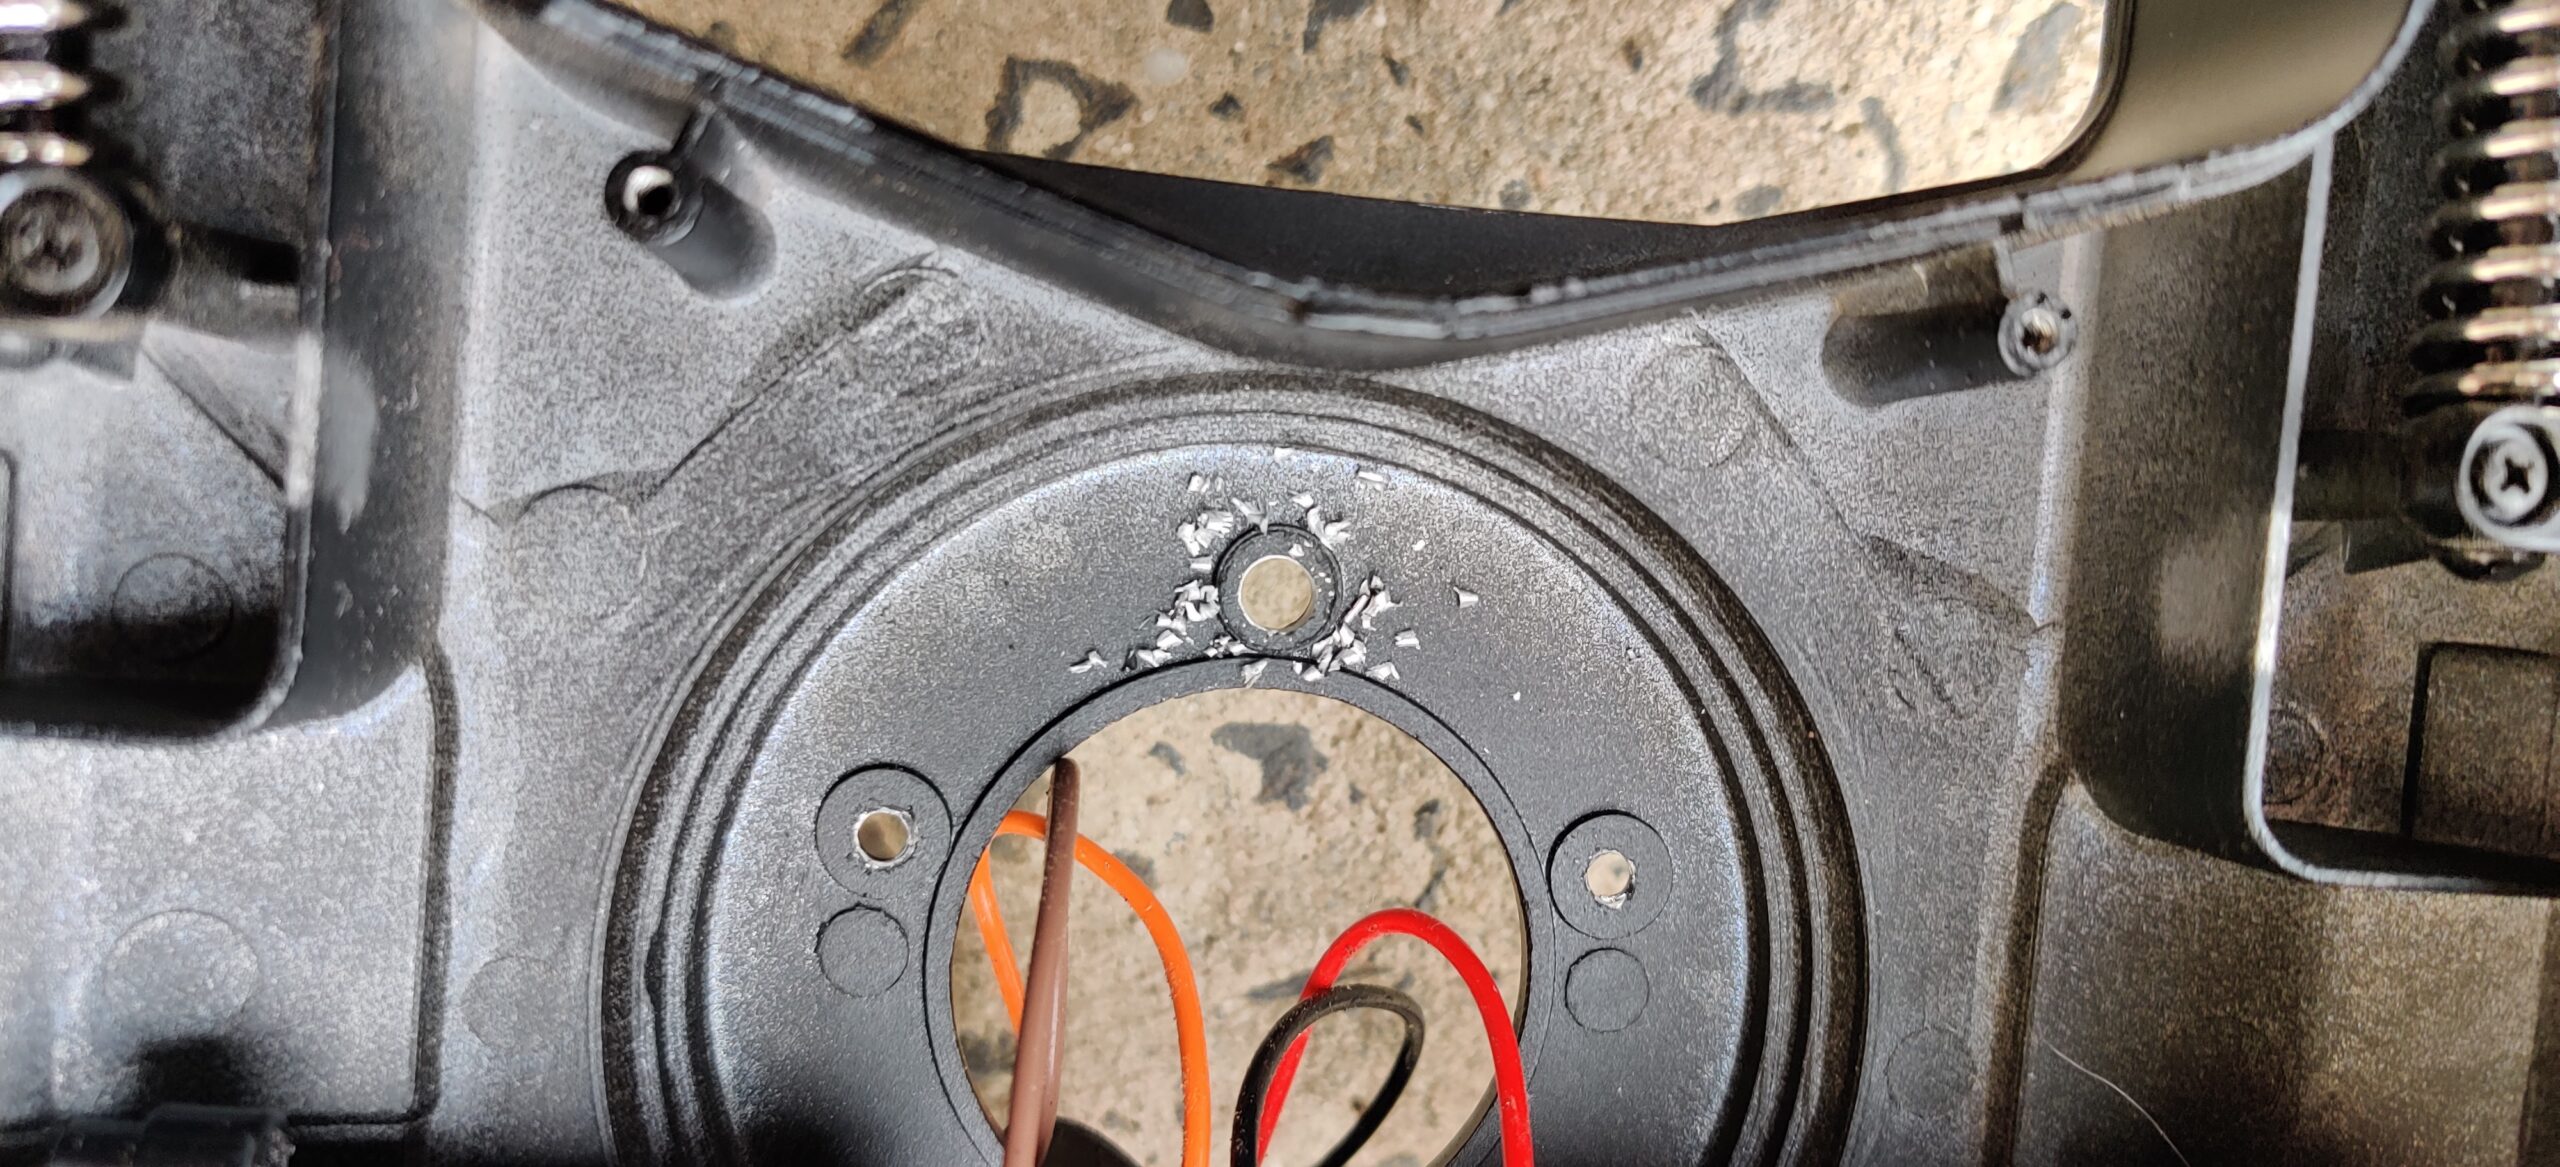
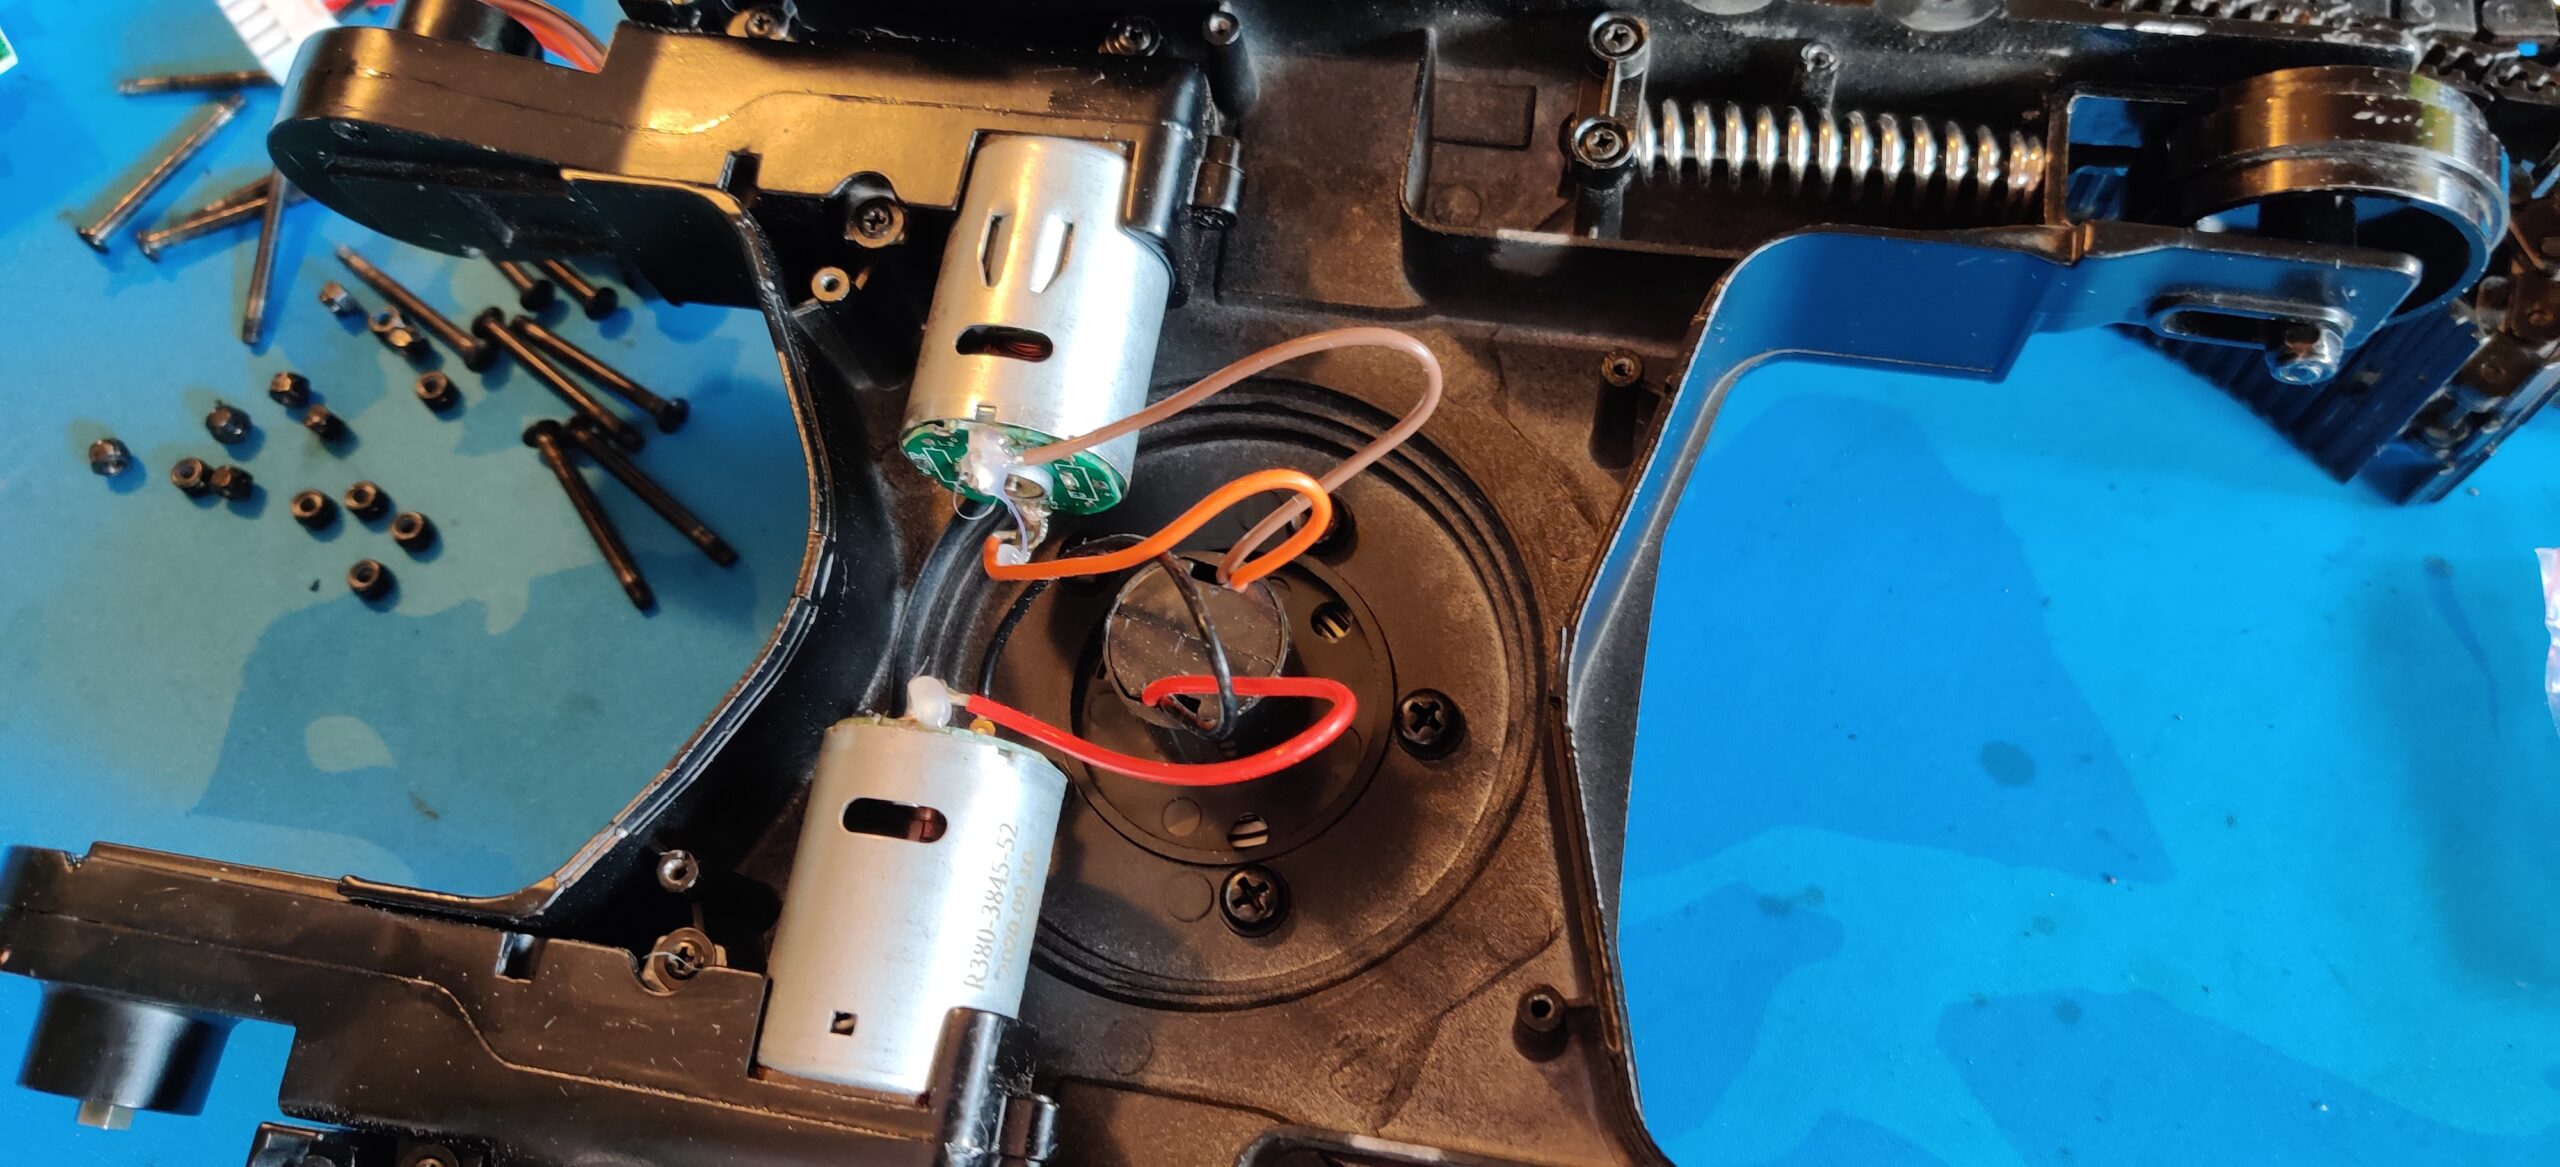
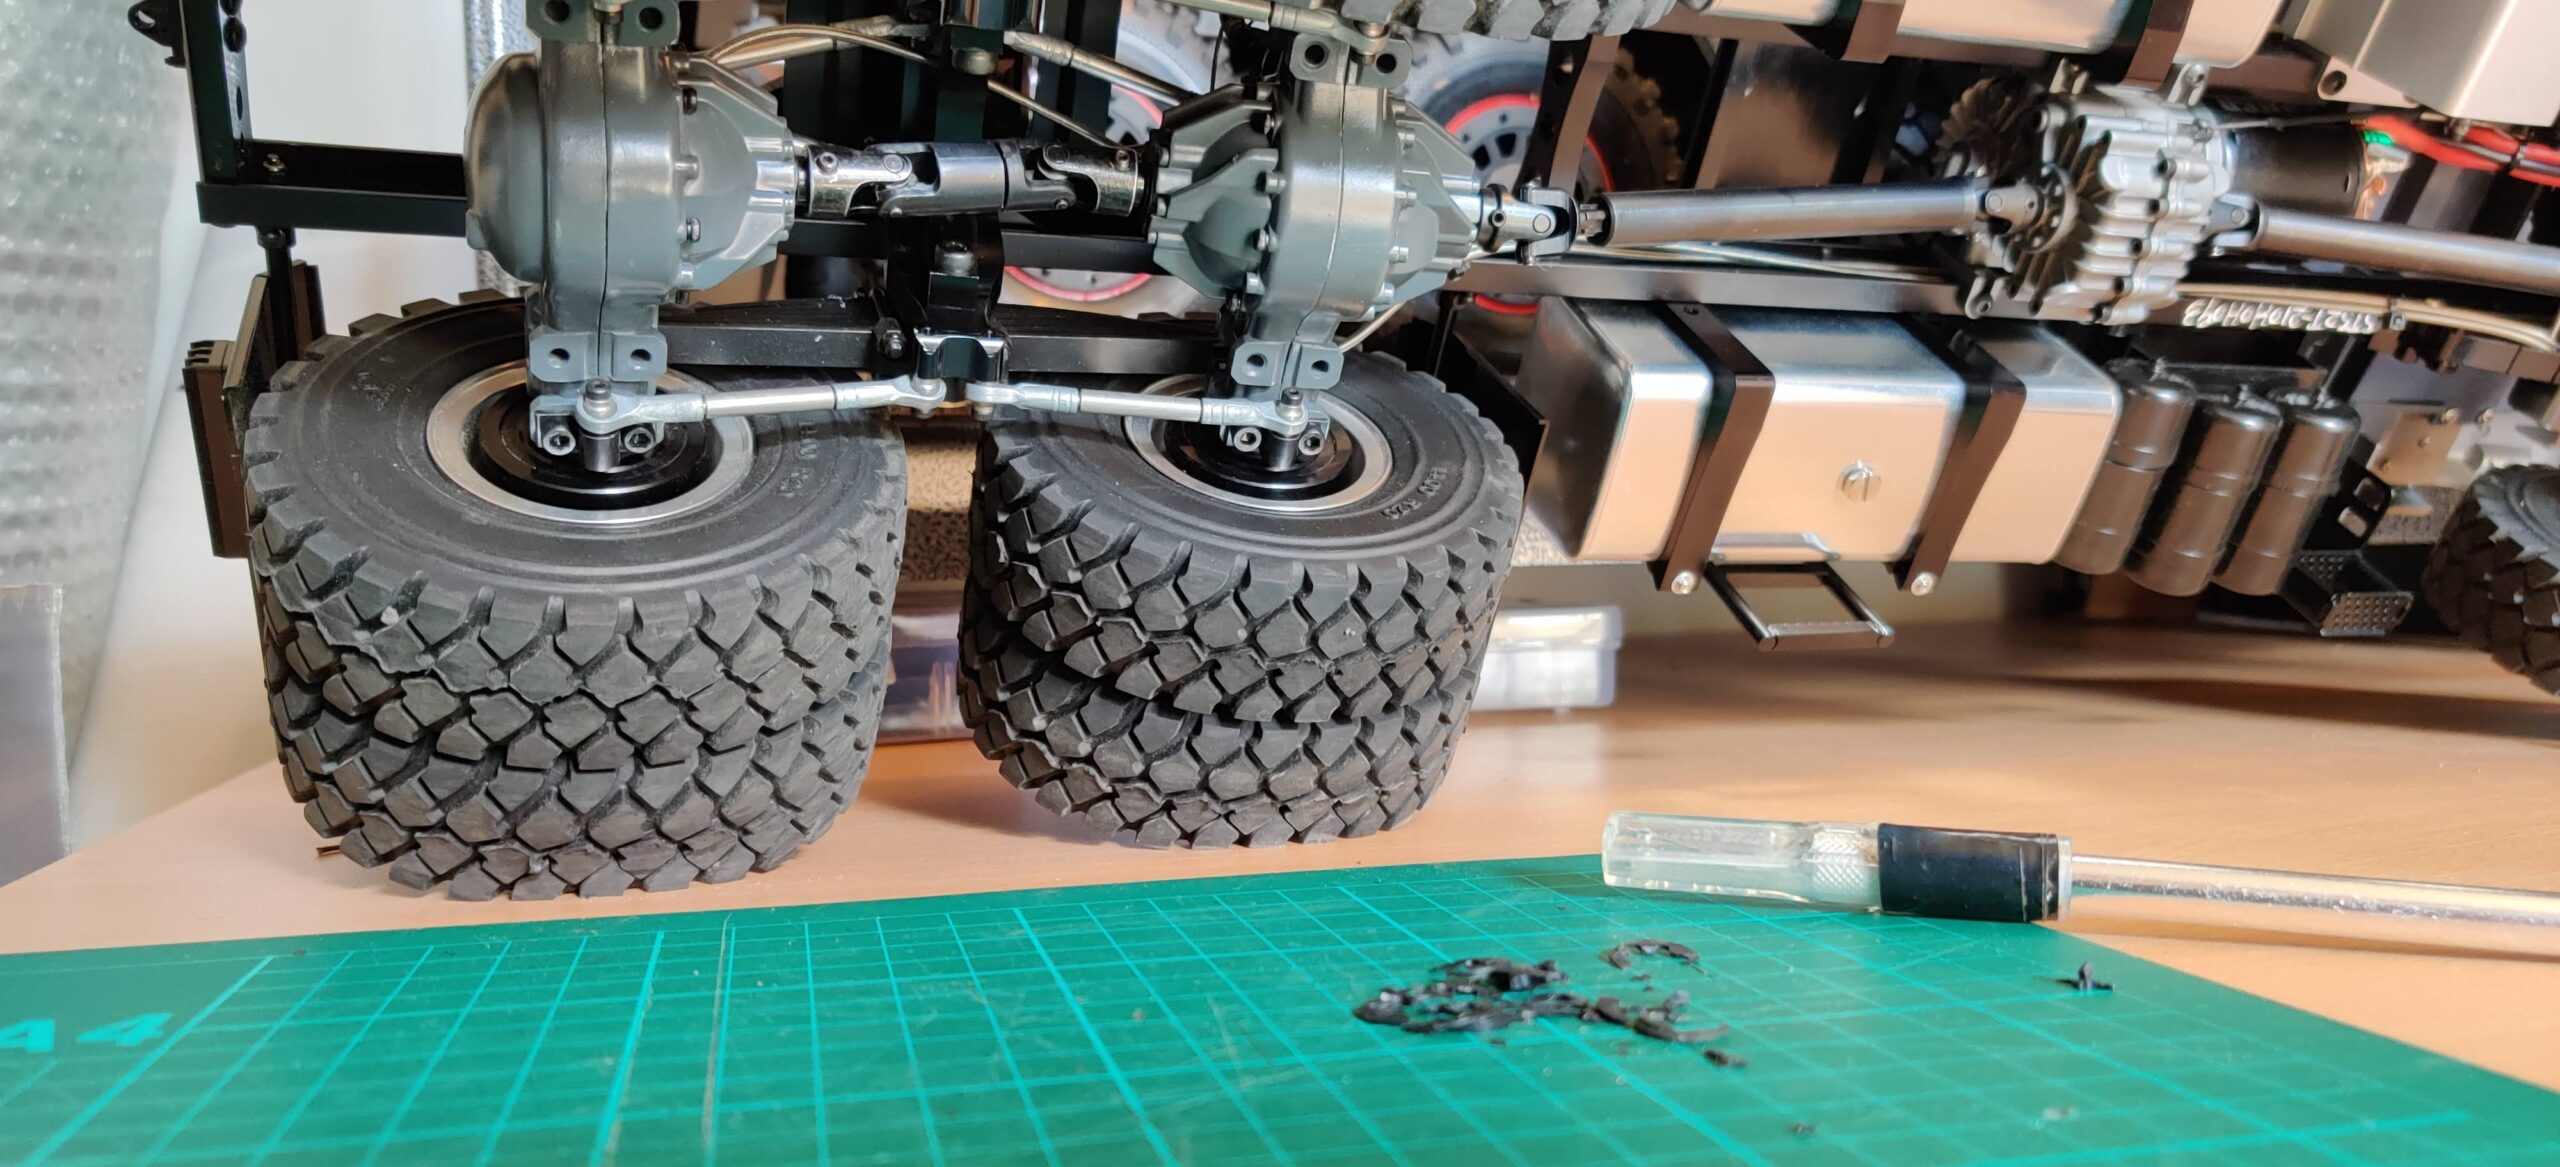
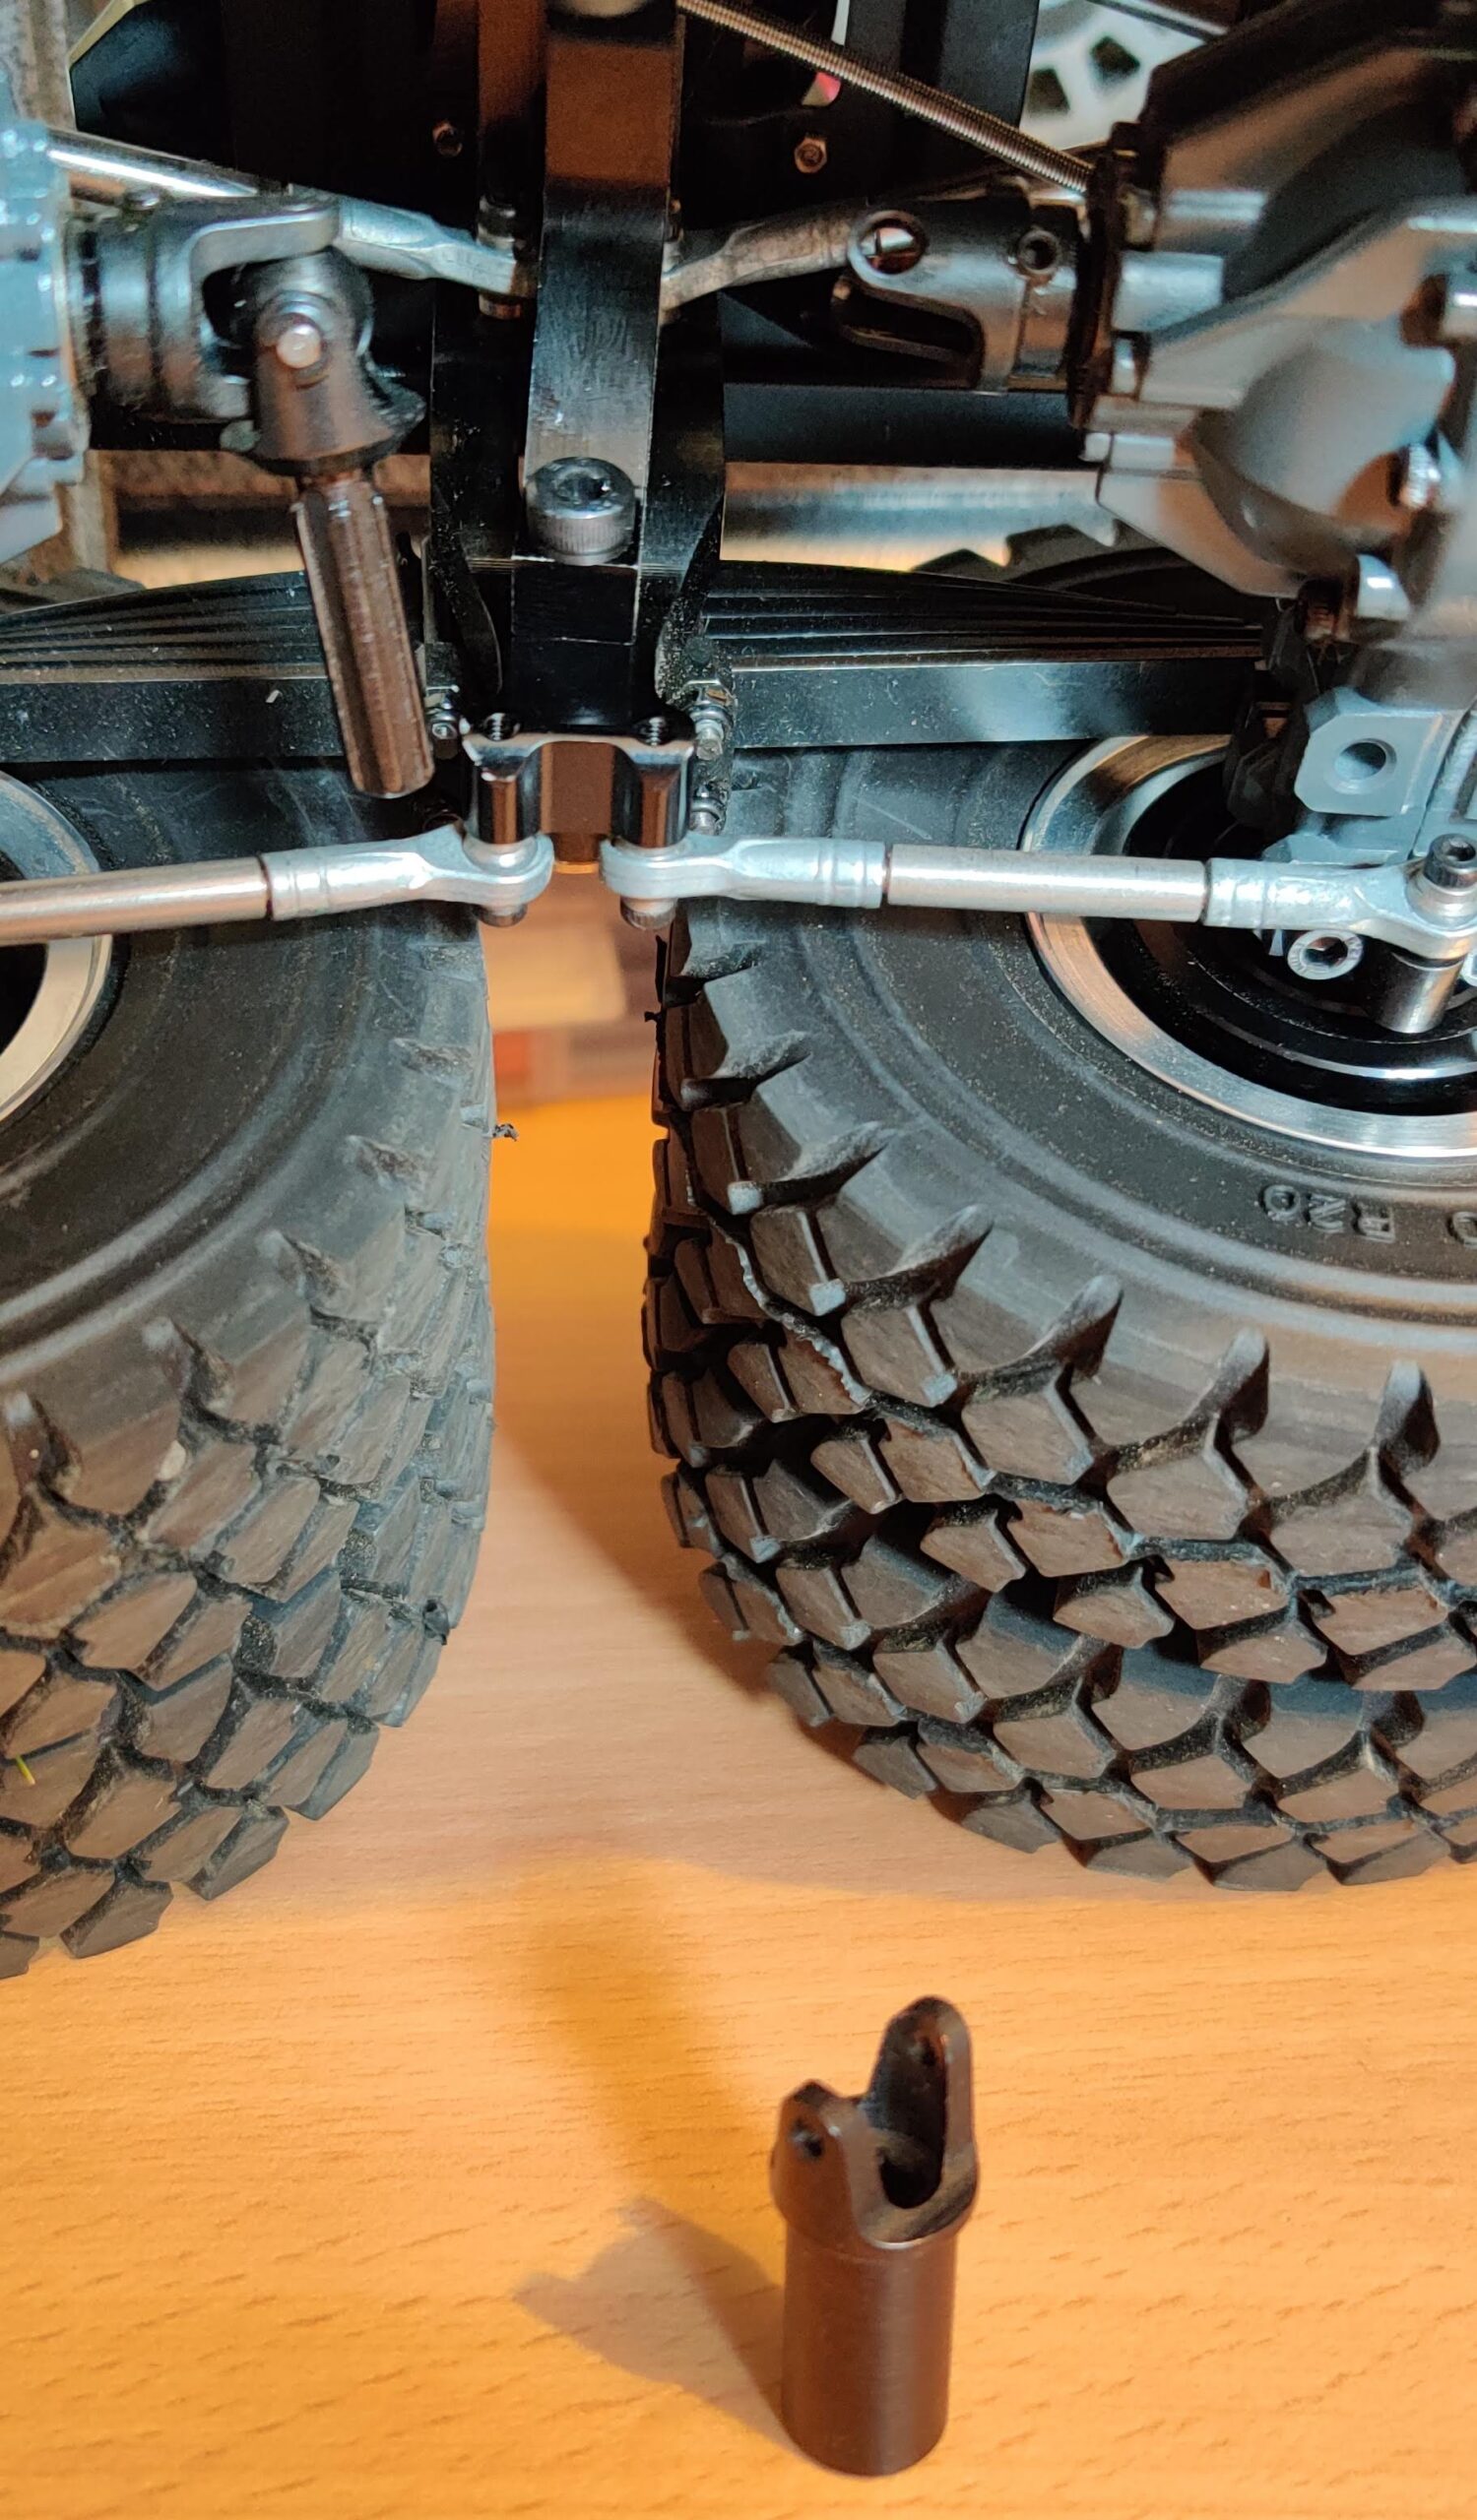
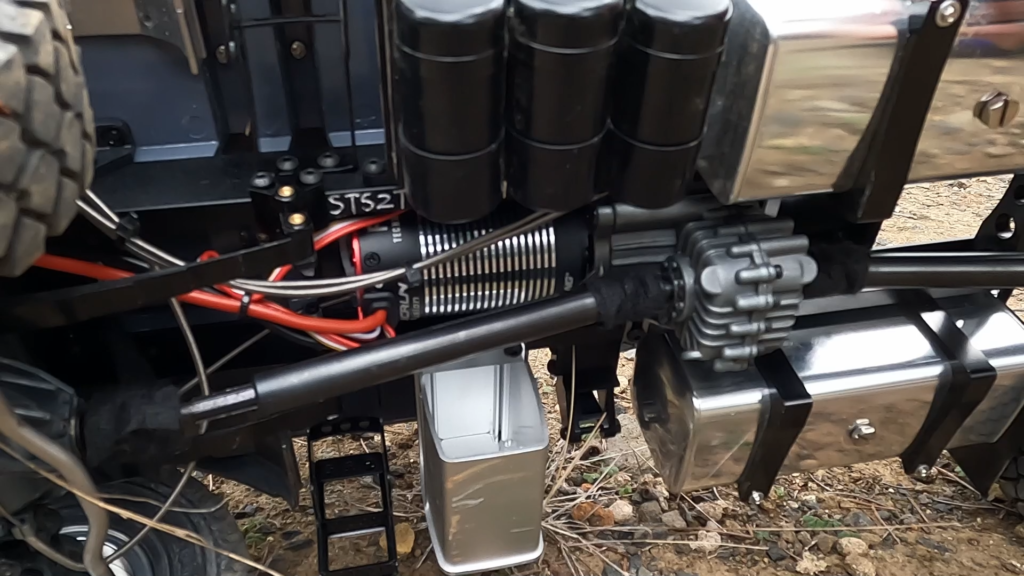
As well as securing your screws with thread-lock, the other ‘gotcha’ with this truck relates to a design shortcoming rather than pre-assembly oversight. Namely, the drive shafts are strong but poorly secured. The universal joint has a hinge block in center that would commonly be secured by a set screw, as many manufacturers commonly do it. However, the units on the Zetros 6×6 truck are secured by a pin with E-clip at each end. It is strong, but unsuitable for off-road use. Those E-clips are exposed on the outside of the shaft collar, so if either of them are bumped by rock or stick passing underneath, they have a tendency to pop off. Once that happens, the whole assembly rapidly falls apart! It can be very frustrating and we had this happen twice on our unit. Not good!
To address this, we surmised the E-clips needed to be captured/covered and prevented from popping off. One could replace the shafts entirely, but it seems a waste, as they’re otherwise solidly made and should outlast the truck. So, our cheap workaround was to wrap a few layers of TESA Tape (or other automotive fabric tape) around the assembly. This way, even if they get knocked by a rock, the E-clips should remain snugly in place. After months of off-road driving since then, it’s been sufficient.


The Good Stuff!
Minor issues out of the way, let’s focus on what makes this model great! The diffs are enormous and feature remote diff lock by cable actuation. The truck comes set up with a three-position switch on the radio that’s connected to two servos. It cleverly achieves two different functions on the one switch:
- High and low speed (more on low speed in a moment); and,
- Locking and unlocking all three diffs.
It works really well and transforms the truck when the going (or towing) gets tough!
The high-speed gear delivers a moderate walking pace at top speed. That’s with the included 55-turn brushed 540 motor and also with the similar speed 1200kv brushless unit we’ve later installed (HobbyWing Fusion 1200kv). Second gear drive ratio is 1:16.
Low speed is where things get interesting. The Zetros 6×6 truck model features a somewhat unusual transmission. High gear is standard fare and 1:16 ratio is fairly typical. However, when you see a number like 1:64 for first/low gear drive ratio, you’ll appreciate why the truck employs a planetary gear set for such a huge reduction. The torque this thing puts out is incredible and the accompanying low-speed capability made possible is just perfect for a heavy tow rig like this! All gears are steel and all moving parts have been consistent and reliable in our testing so far. Again, we’ve had ours for 7 or 8 months at time of writing this article.
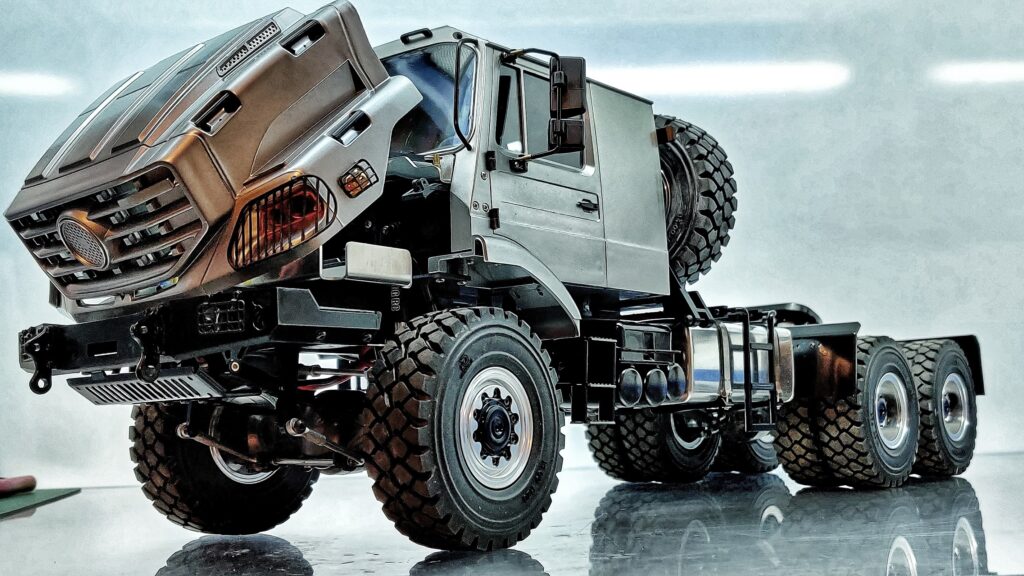
Cabin Fever
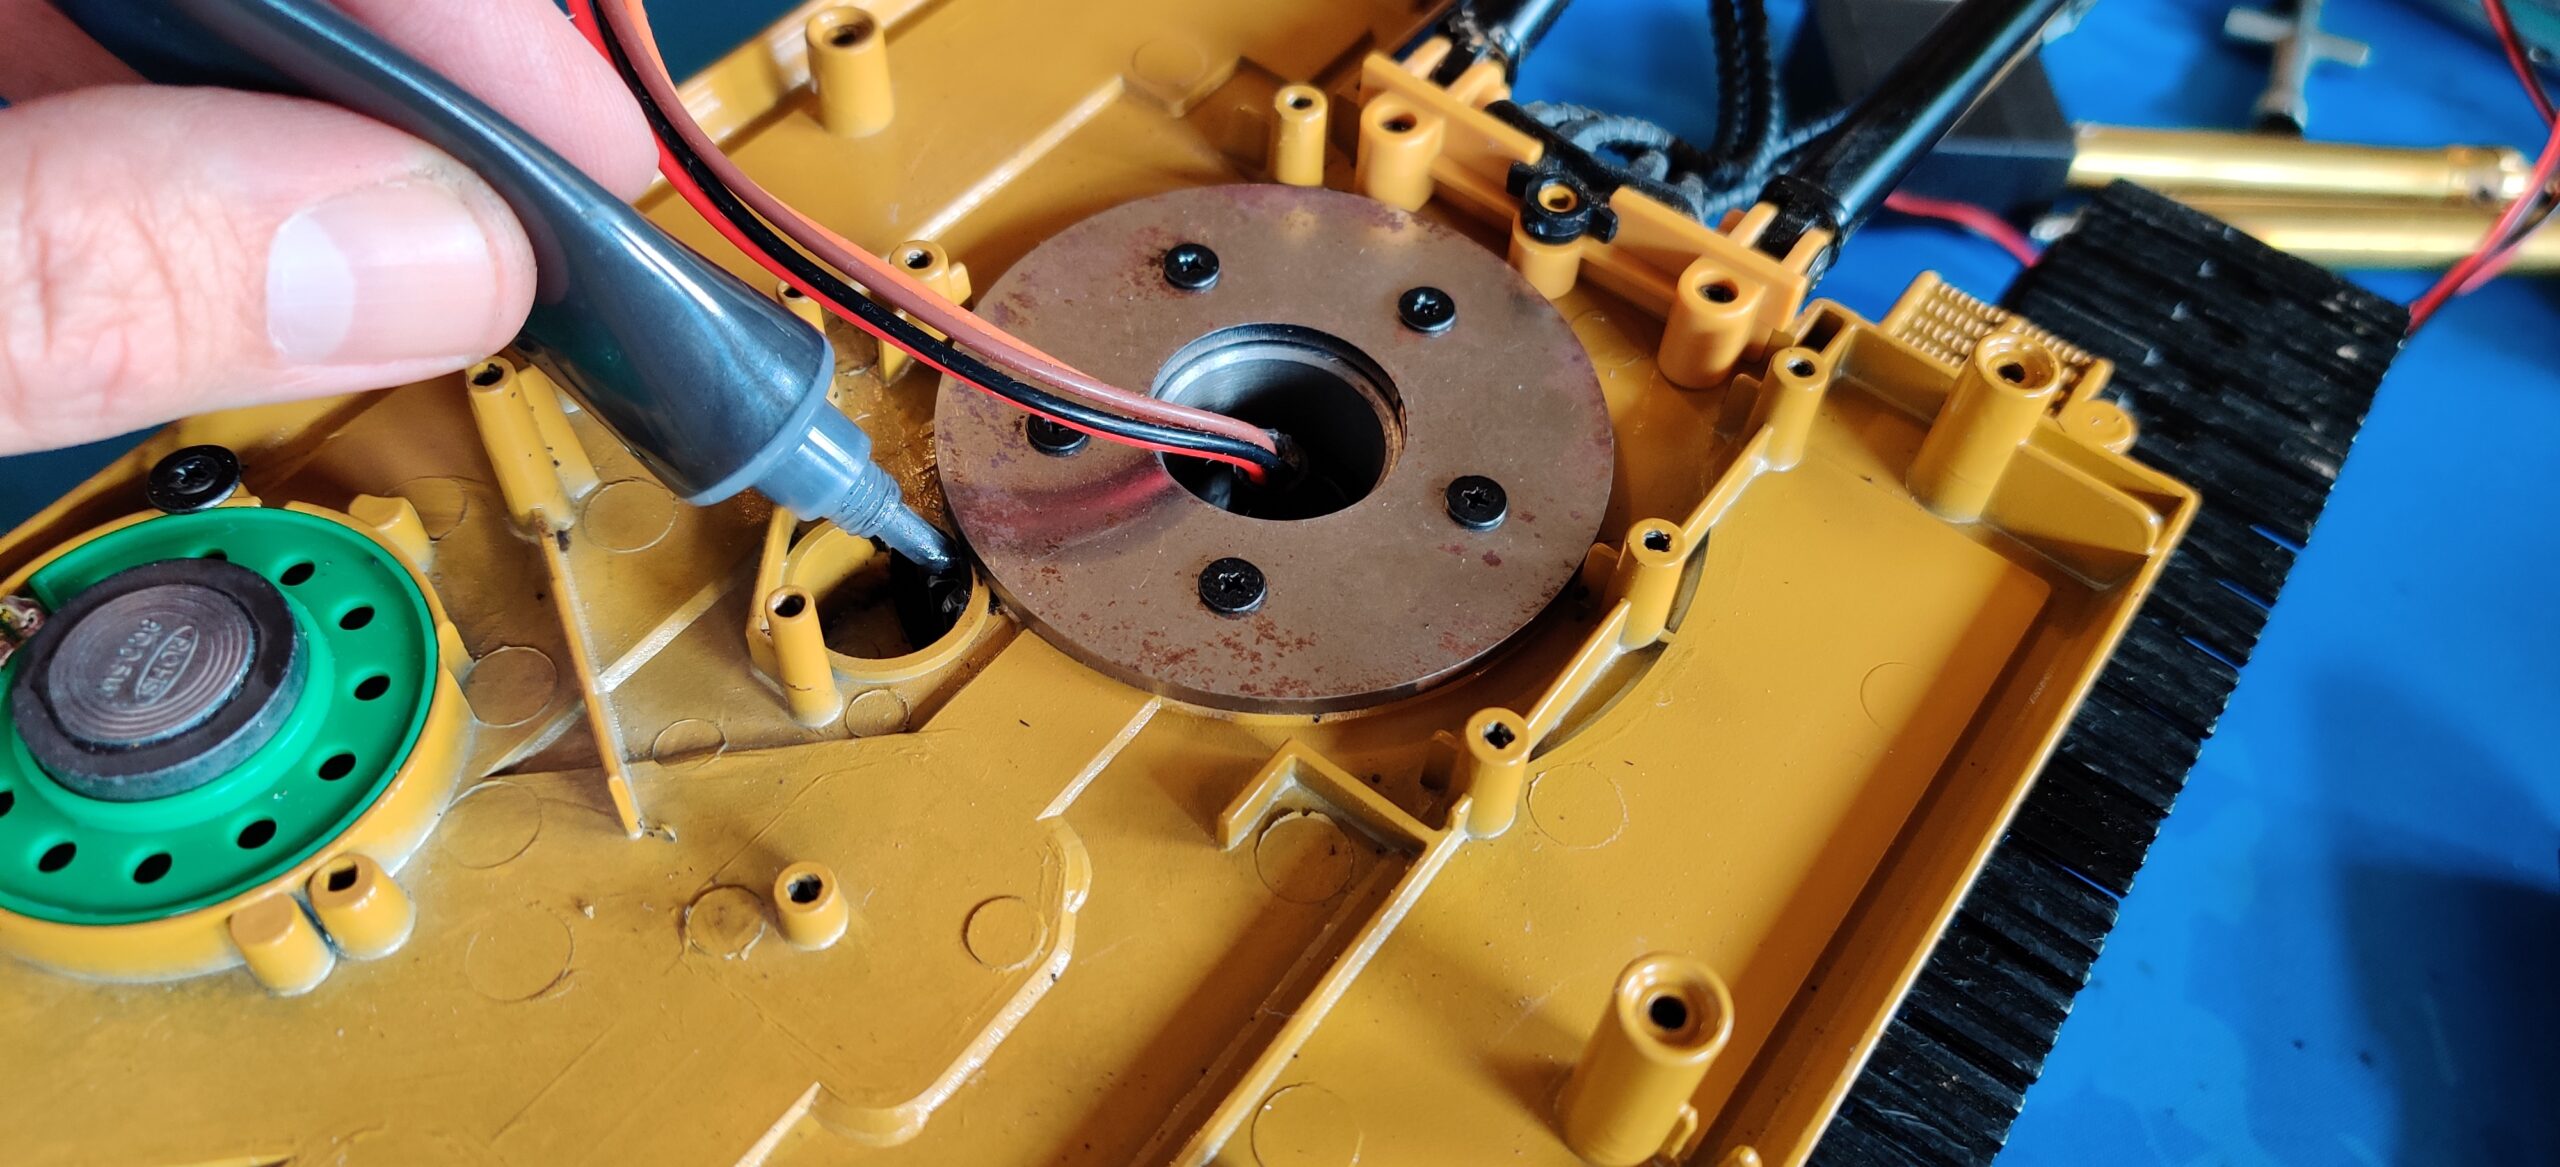
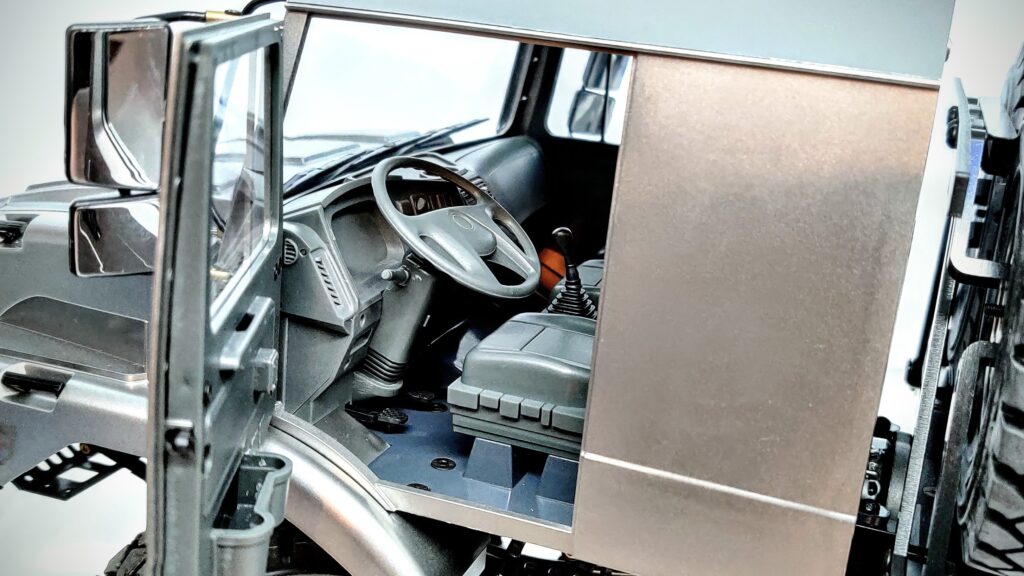
The drive train is wonderfully tough, but that’s not all to love with this machine. The scale cabin features integrated and functional spare wheels mounted on a swing-out bracket behind the rear window. There’s ample clearance for most scale trailers on the hitch plate behind it and they just look great. The cabin itself is plastic and is coloured silvery-gray. This is not paint but the plastic itself, which is good news for scratches and longer-term aesthetics. Both doors open, as does the hood, under which is an aluminium battery tray and the model’s radio and ESC.
Inside the cabin is a scale interior, with three seats and a full dash. The steering wheel and pedals are convincing and the dash controls look good even unpainted. There’s room to fit a 4” to 5” action figure/driver.
Trim and Terrific
The mirrors are realistic, as is the trim around the hood and the guard bars around the lights. Empty but functional light buckets and a snorkel round out the scale fittings. Aside from the integrated light buckets, these external trim items need to be installed after you get the truck. Presumably this is because they are too fragile to reliably survive shipping. Thankfully, installation is easy to do. The only weird part of the cabin/hood piece is the headlights, which are coloured amber rather than clear or white. It’s a strange decision but it isn’t distractingly bad, just noticeable.
Bumper to Bumper
The front bumper is plastic. There’s a bash plate underneath it that is metal. Both pieces look good and both are made of the most appropriate material for their function. You want a bit of flex on the upper, main bumper, while the metal bash plate is protecting the sway bar-cum-lower linkage in front of the axle, which you do not want to break!
At the other end of the rig are a set of four metal mud flaps. They’re attached by tiny screws in a somewhat complex assembly. The threads on a couple of ours were stripped from over-tightening at the factory. We tapped a larger thread and installed bigger hardware but found the metal quite soft. Second repair attempt was simply using a longer bolt with locking nut on the other side. Both methods will work. Be prepared for yours to take damage either in transit or during driving – they’re fragile and not a great design from a durability point of view. They certainly look the part and the rear-facing ones have light buckets in them, ready for your light kit if you so desire.
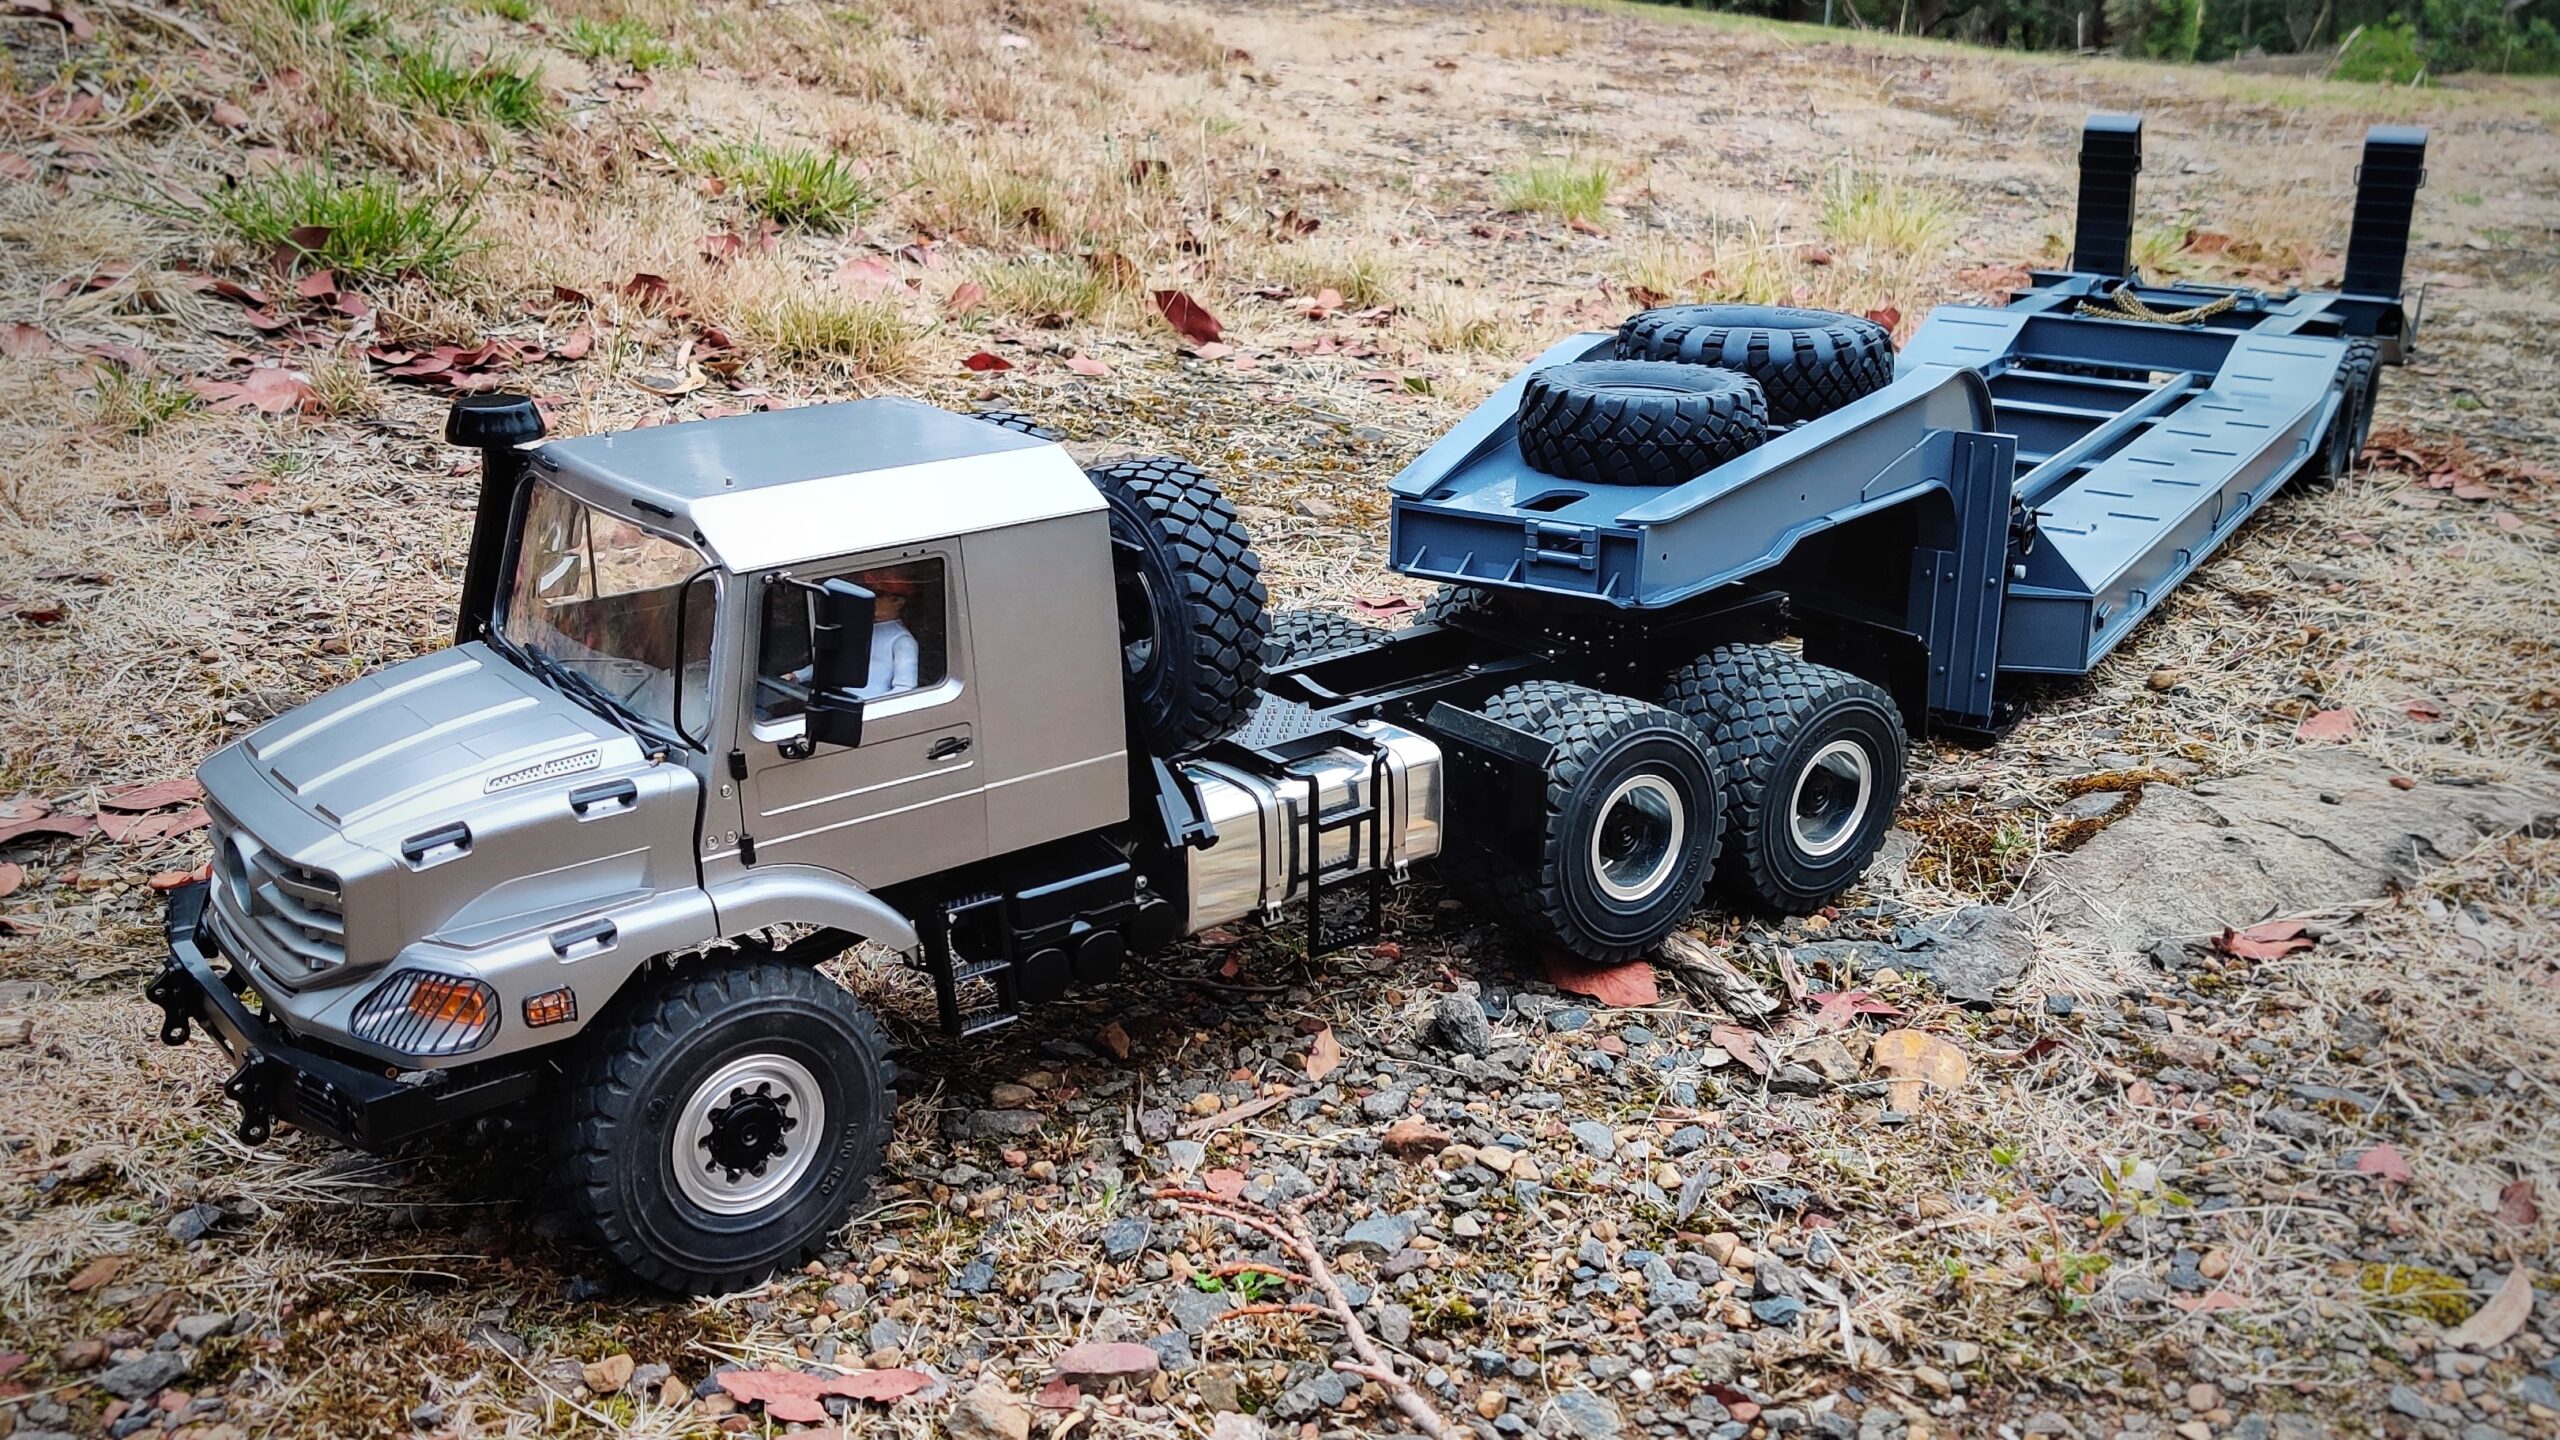
The bumpers and mud flaps round out what is a fabulous looking scale body. The twin, shiny chrome fuel tanks that double as actual, functional hydraulic oil tanks look brilliant. Also completing the distinctive look is the prominent pair of spare wheels. Speaking of which…
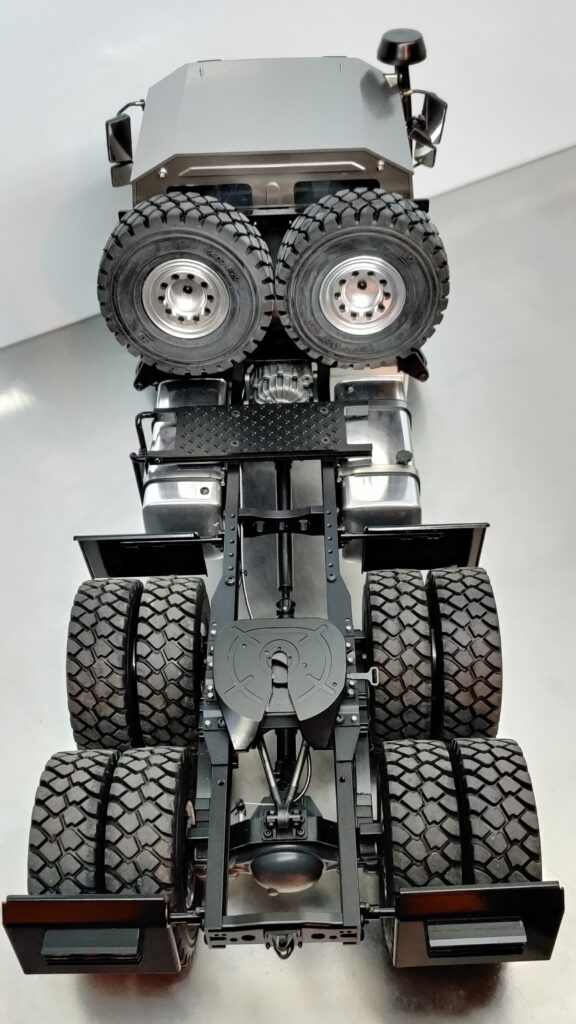
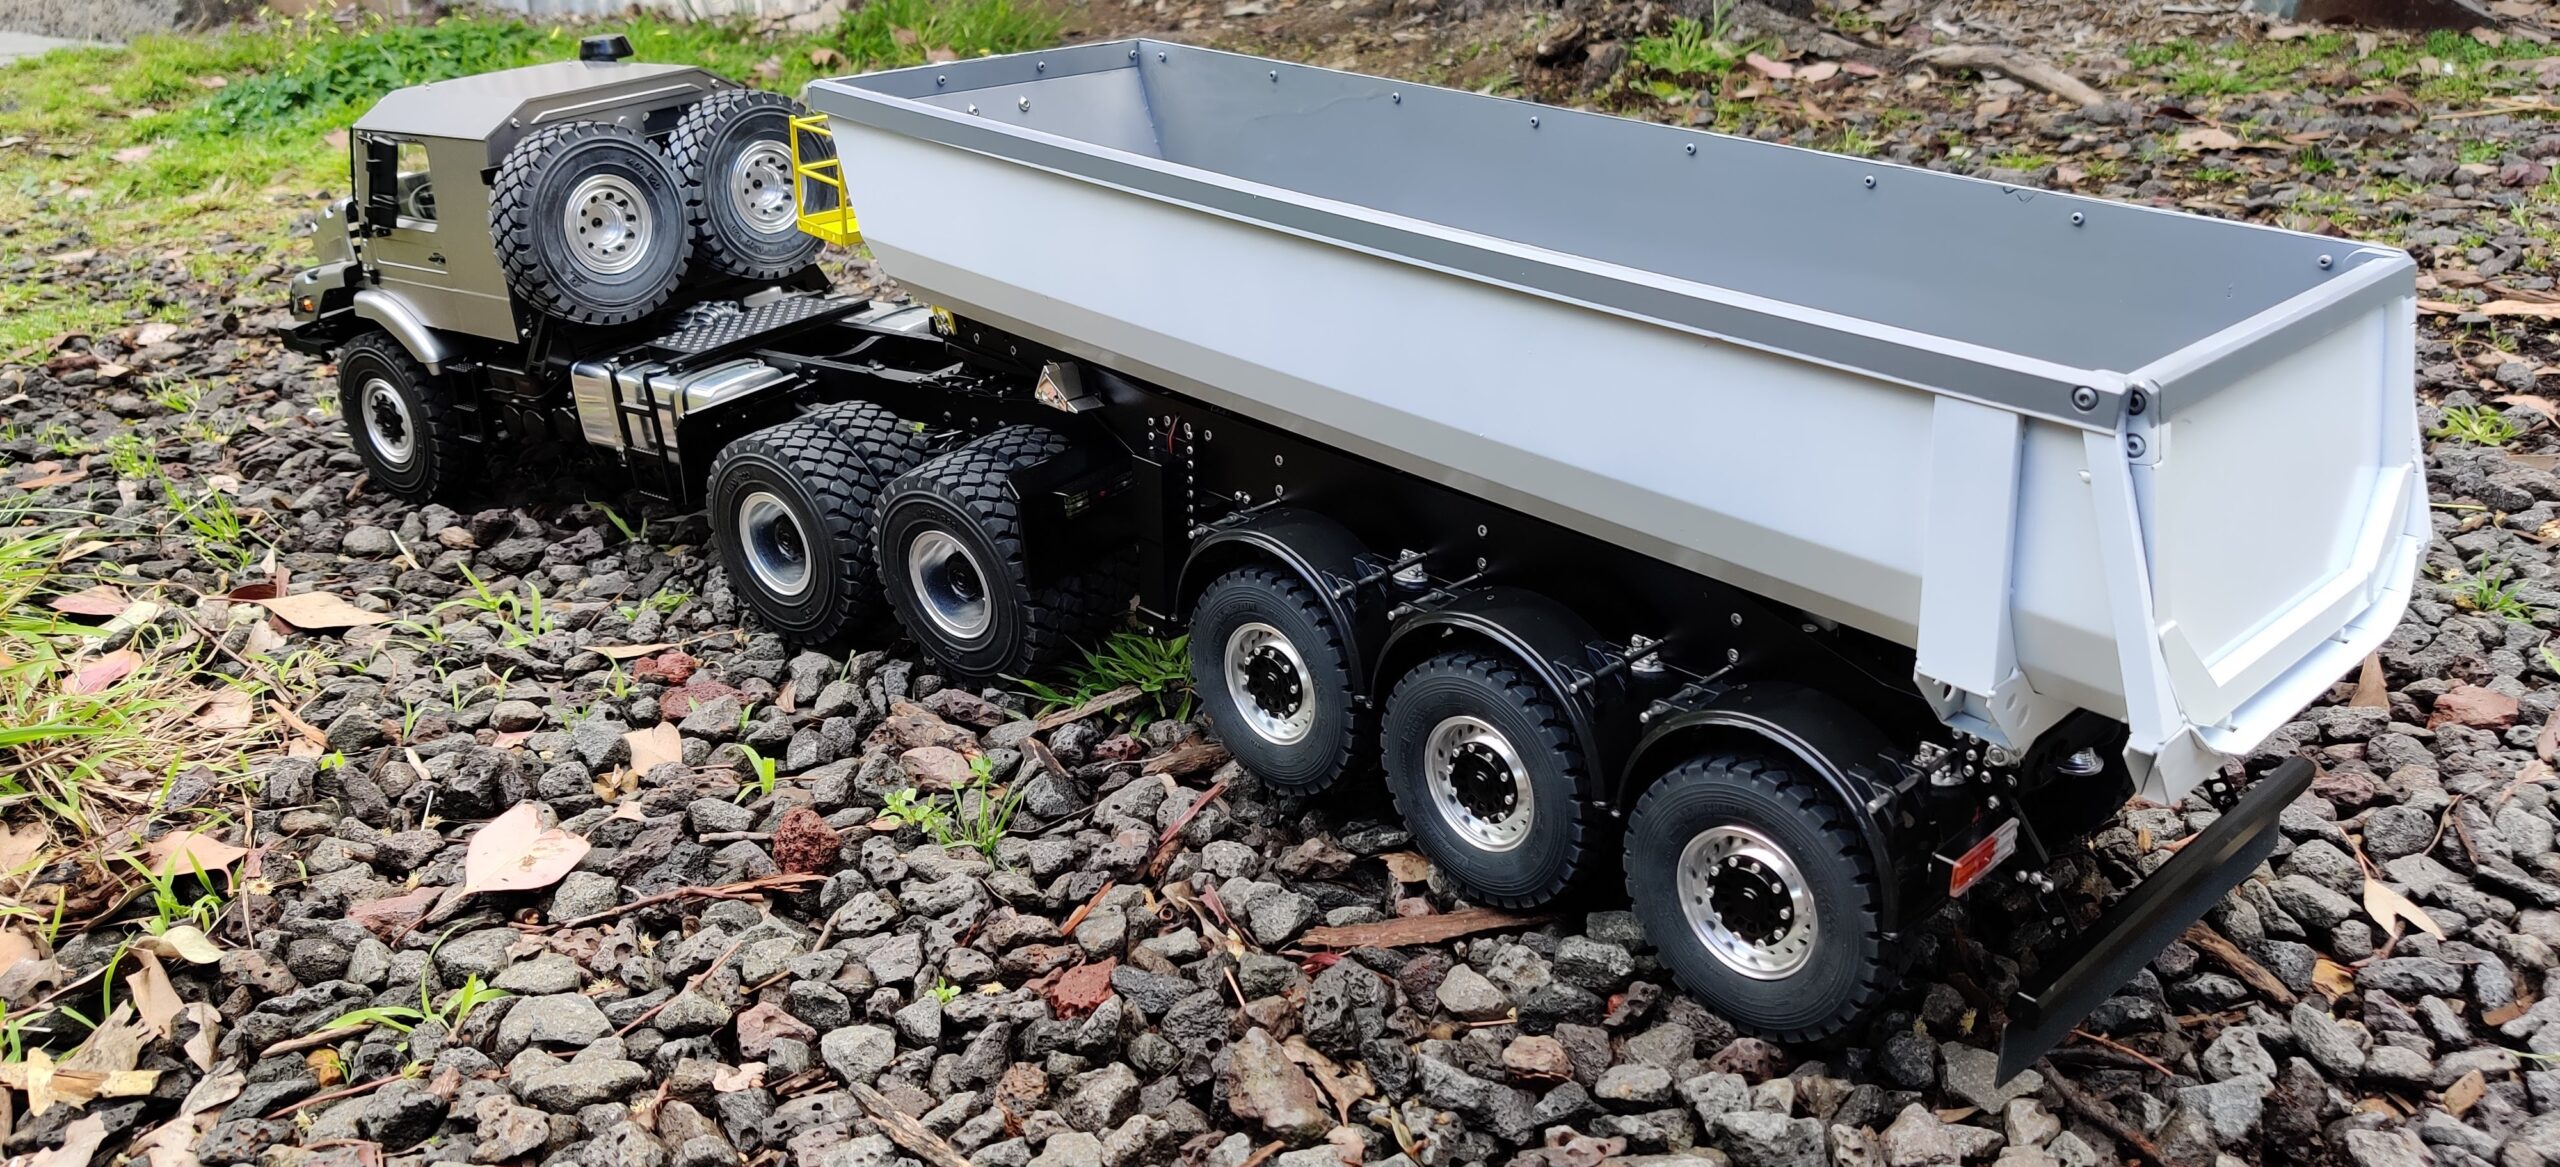
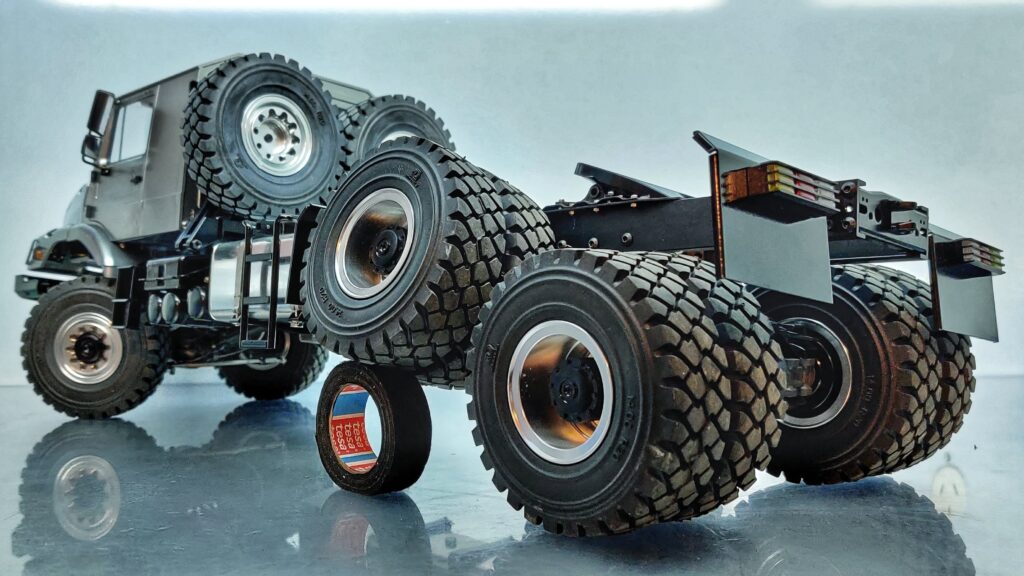
Wheels and Tires
This is a 6×6 truck with twin dual wheels on the rear axles. There’s an additional pair of functional spare wheels mounted up top. That’s 12 aluminium wheels and heavy-duty tires for this Zetros 6×6 truck! The wheels feature attractive, black metal hubs and the tires are super firm. There is some air inside, but its only from the moulding of the tires. There are no foams and they hold their shape due to the sheer amount of material in their carcasses. For a heavy towing truck, the wheel and tire choice is completely appropriate. Tread pattern is good for an off-road capable truck and besides all that, they just look fabulous.
Electronics
The truck ships with a 55-turn brushed 540 motor, a 9kg steering servo and a pair of 4.5kg shifting servos for high/low and diff lock duties. The ESC (Electronic Speed Controller) is a HobbyWing WP-1060 with integrated 6v/3a BEC (Battery Eliminator Circuit), which powers the radio and servos. The radio is a 6-Channel DumboRC system. The high-low/diff lock function is located on the 3-potision Channel-4 thumb switch.
The ESC is waterproof, as is the motor. However, the servos and radio gear are not, so keep that in mind if you plan any extended outdoor adventures. The radio transmitter requires 4x AA batteries and the truck runs best on a 2000mAh to 2500mAh 3S 25C+ LiPO battery. It would run acceptably on 2S or even NiMH stick packs and there’s sufficient room in the battery tray for up to 5000mAh 2S LiPO or 3500mAh NiMH stick packs. For best results use a 3S LiPO. We’ve been using 2200mAh 3S 30C packs and the truck has been perfect.
Lastly, there are several spare channels on the included radio receiver. These will be welcome if you have a trailer that needs a channel or two for tipping, support legs, third axle, hydraulics and so on. The radio suits the truck and possible intended uses perfectly.
The Driving Experience
Our initial video review (as shown above) was all about the truck itself. Because of our drive shaft problems, we never really got a chance to showcase much actual driving! We’ve been enjoying the truck for some months since that initial review and it’s running beautifully. It seems timely we make a follow-up video that covers all the main elements of operating this big rig outdoors. In the below video, we cover high and low speeds, diff lock, steep ascents and descents, side-hilling and even some mild rock crawling.
We also discuss towing. However, as we have yet to find a suitable trailer to use with this truck, all driving so far has been done with the hitch plate empty of load. That makes for a rougher ride with those super-firm rear leaf packs, but the heavy diffs and ultra-low center-of-gravity have made up for any shortcomings in smoothness!
In short, the truck is a pleasure to drive and it looks fantastic on the trails. Catch the video for the longer answer!
Let’s Torque About It
Once we got the drive shafts sorted out, the next thing to improve was power efficiency and torque. The included 55-turn 540 motor was definitely appropriate for the big truck, but we wanted a more broad speed range and better battery life (though it’s pretty good for brushed, already). We installed the all-in-one HobbyWing Fusion 1200kv motor and ESC in place of the 55-turn brushed motor.
The Fusion gives unparalleled smoothness and control at low speeds, even under load. This is thanks to the FOC (Field Oriented Control) system HobbyWing employs in their Fusion and AXE line of brushless systems. The motor spins according to your throttle input and is computer-controlled to maintain that speed even under load. More traditional brushed, sensored systems will slow as load is applied, requiring you to increase throttle signal. The FOC systems instead will boost power to the motor to ensure it delivers exactly the RPM you ask of it, regardless of load. It’s a bit of an acquired taste and maybe not for everyone, but on a heavy truck it’s just fun, fun, fun. Very satisfying to see this thing inching its way up a stupidly-steep hill, or to exude buttery smooth control down a steep rock face!
Water, Light & Sound?
Power system aside, the other upgrade you may consider down the track is to install a waterproof servo set. The default equipment is fine and the steering strength is ample for this kind of model, but you’ll need to keep the truck dry above axle height. You’d also want to waterproof the radio receiver for wet running.
A light and sound kit might be last on your upgrade list. There’s a premium version of the truck out there that includes these, but is hard to find. Besides that, it’s worth noting the all-metal gear drive train sounds pretty good on its own when running, even under no load. There’s a lot of sound under throttle, but it’s a pleasing pitch and it sounds like there’s a lot going on inside. It’s quite a fun rig to drive and again, it looks fantastic.
The Verdict
If you want to add a 1/14 scale truck to your stable with off-road capability and/or heavy towing capacity, the Zetros 6×6 truck should be on your short-list. Regardless of vendor, its cheaper than the other off-road (ish) options from the likes of Hercules Hobby, Tamiya, JDM and LESU. Price isn’t the only attraction; this thing is absolutely capable. Decent price and performance, plus it’s gorgeous? This one is easy to recommend!
Where to Get It
The Team Raffee 6×6 model is available here & the TR 4×4 model is available here. Both these links are from the ever-reliable AsiaTees online store. Alternatively, you can find the truck on the Highway Toy Store here. Lastly, it sells under the RC4WD Sledge Hammer badging here.
One Last Thing
Like the Zetros model? Enjoy playing with Lego? We’ve got an RC Lego Zetros to show you, too! Check it out here: https://youtu.be/moggvEgLaP8

Craig Veness
RC-TNT
Craig has been into radio control since the 90s and into RC crawling since about 2010, when a Losi MRC started the obsession! Now it’s all rocks this and crawl that and upgrade all the things! …You know how it is, right? Welcome home 🙂