Huina 1569 RC Bulldozer (2021 Model)

Huina 1569 RC Bulldozer (2021 Model)

Meet Huina’s Tiny Dozer

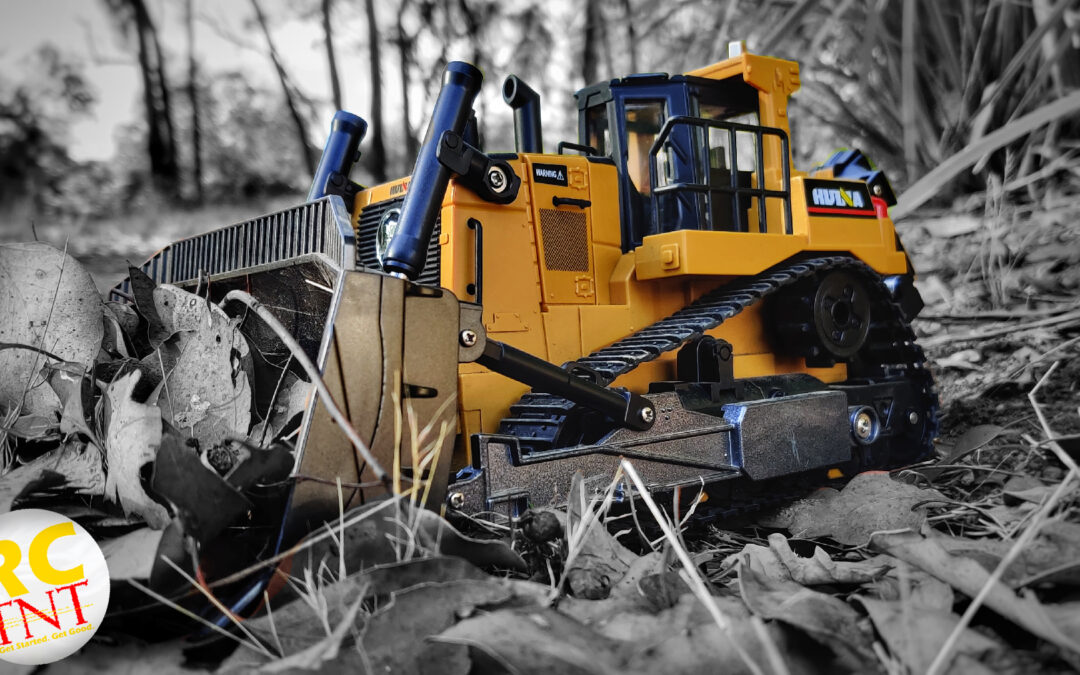
This is a working scale model of the Caterpillar D11 bulldozer, a 115 tonne, 850HP, 10m long monster! The D11 is a big machine! The 1569 is a functional model bulldozer with a metal blade and articulating arms, metal ripper in the rear and plastic body and internals throughout. The machine is capable of moving about 1KG of payload which, for its size, is impressive. Just don’t expect it to be as big and tough as the Tonka-style sandbox trucks the kids play with.

Huina 1569 with Diggers

Childs’ Play

And speaking of kids, the Huina 1569 RC Bulldozer is well-suited to child’s play. I bought this as an adult with existing RC ‘big boys’ toys’, including several hydraulic machines and the smaller – but still hefty – Huina 1580 excavator. Whilst the rest of my RC construction ‘fleet’ is 1:14 scale, I expected the Huina 1569 RC Bulldozer to be only a little smaller with its advertised 1:16 scale. However, as it’s modelled on the Cat D11 in real life, the math doesn’t lead at all to 1:16. Rather, while the Huina model is claimed to be 1:16 scale, its actual scale is about 1:29!

Coming back to kids, with its rubber tracks and smaller size and weight, this model is well suited to play by smaller drivers. Our resident 9-year-old has enjoyed numerous sessions with this machine in gravel, sand and the dirt of a garden. The ripper on the back is actually functional, though limited in what it can achieve on harder ground. The blade up-front is well capable of moving loads around.

Huina 1569 Moving Leaves
Cat D11 Dozers

Bulldozer Control

The Huina 1569 RC Bulldozer comes with a 7.4v 600mAh Li-Ion rechargeable battery and USB charger (40-60 mins playtime, 60-120 mins charge time). The remote control needs just 2x AA batteries and you’re good to go. The left and right thumb sticks each control the tracks, though they’re not proportional – control is simply ‘on’ or ‘off’. Understandable for the price, but a little disappointing all the same. There’s a center button above the power switch that turns sound on and off and the button pairs above that control the blade’s up-down motion (it’s cyclical, so hold either to have it cycle between down and up) and the ripper (top button lifts it, bottom button lowers it). That’s it for controls, it’s basic but for this type of machine, that’s totally fine.

Huina 1569 Controller

How’s It Go?

It goes alright, actually! In our review we used it just to clear leaves and twigs, but it works well enough on softer ground that it’s functional for play. Just be sure to keep it light play. This is nothing like the heavier duty gear that Huina sells, let alone the even bigger hydraulic scale models! Have a look at our video review below for a better idea on how the Huina 1569 RC Bulldozer runs:

More Info

  • Find the manufacturer’s page here: https://huinaconstructiontoys.com/products/huina-1569-rc-bulldozer
  • Bulldozer overall dimensions are 35x20x16cm (LxWxH).
  • It weighs about a kilogram (or 2lb, roughly) and can move about that amount of mass.
  • In the box you get the model itself, a small manual, the 600mAh battery, USB charger and controller.
Huina 1569 Package
Craig Veness

Craig Veness

RC-TNT

Craig has been into radio control since the 90s and into RC crawling since about 2010, when a Losi MRC started the obsession! Now it’s all rocks this and crawl that and upgrade all the things! …You know how it is, right? Welcome home 🙂

Huina 1580 RC Excavator Upgrades

Huina 1580 RC Excavator Upgrades

The Huina 1580 is great out of the box. This has been a while coming, but we’ve finally gotten it done: stronger actuators, waterproofing, improved stability and… a driver!

Capable in Stock Form

When we first looked at this machine in 2021, it was just fun and impressive – smoke, lights, sound, multiple attachments – awesome! Check out the original review video here:

Huina 1580 Good Points

The Huina 1580 is an all-metal RC excavator with electric linear actuators. They’re strong, with 4kg to 5kg of strength on the boom and stick. Presentation is excellent in the box and it’s easy to use. Scale looks, sufficient weight to have authority over the work it’s performing, I was very happy with it.


Things I really like:

  • It’s easy to work on, Philips head screws aside.
  • It’s all metal, which makes it nice and heavy and stable when digging or lifting things.
  • The controller is comfortable and logically laid out.
  • It looks great!
  • All connections internally are made via plug connectors, so you’re not risking metal fatigue and seeing solder joins weaken and fail. This plug arrangement follows all the way up through the inside of the boom and stick – very impressive.
  • Hall sensors and magnets are employed as end-point stops. This is reliable and elegant – all the more impressive considering it’s a hidden bonus that most users won’t ever be aware of. Thoughtful design is great to see!
Huina 1580 Quarry

Bad Points

I was happy with it until one of the linear actuators started slipping. Once that clicking started, the strength was compromised and not easily fixed. More on that in a moment.


A few other minor points:

  • The door doesn’t open on the cabin – a shame. You can still access the cab but you need to take the cover off and remove internal screws to get to it.
  • All screws in the machine are Philips head. The ones that look like hex bolts are actually just plastic covers that hide Philips screws underneath (and they’re really hard to remove!).
  • There’s a half-second delay between control input and machine response on the tracks. Thankfully, the proportional control on the model is otherwise instantaneous.
  • Swapping the tools between breaker, grabber and bucket is a pain. The screws strip easily and it’s fiddly.
  • The main bearing is a bit sloppy – there’s lateral movement and it wobbles too much. This harms accuracy when you’re trying to rotate to get the bucket positioned ‘just so’.
Huina 1580 Grabber
Huina 1580 Grabber

Making It Better

I’ve had mine for half a year. That’s long enough to have a good feel for its strengths and weaknesses. As well as the stripping gear inside the actuator assembly, I had a small list of things I wanted to fix or change on the Huina 1580:

  • Replace stock linear actuators with stronger units.
  • Give the electronics some weather resistance so rain and shallow water wouldn’t be a concern.
  • Make better use of the power accessory port on the stick, ideally with an electric tool changer (ie. be able to change buckets using the remote, without needing tools).
  • Remove the slop/wobble in the main bearing.
  • Set up a remote-controlled tool adapter (tool-free bucket swap).
  • Put a driver in the cab for more scale realism!
Huina 1580 Cabin

Getting Ready

Tools you’ll need:

  • Small angle grinder or a decent metal hand file and/or cutting tool (if you’re patient – the metal is pretty soft but a grinder is easiest, if you have access to one, even a cheapie like this – just don’t skimp on eye protection in particular!!).
  • Philips head No.1 and No.2 screwdrivers, plus a jeweller’s size No.1 (the largest size in a jeweller’s driver kit).
  • *2.5mm hex driver.
  • 4mm and *6mm drill bits and power drill.
  • Small black cable ties for tidying up (and wire snips to remove the originals as needed).
  • *Needle nose pliers (or a 4mm spanner) – this is only for the locknuts on the small jockey wheels under the tracks.

*these tools are only for if you’re doing the main bearing. Skip these if not.


Parts List

Here’s the list of parts I ordered for the upgrade and overhaul. Of course, everything is optional here, but I’ll note the things you can skip if you really just want a stronger Huina 1580:

  • Linear Actuators: the main upgrade for the Huina 1580. We’re looking to improve strength and this is how we’ll do it. You’ll be able to use the original radio transmitter and excavator control board – this is a plug-and-play upgrade. The ones I bought are no longer available and after an exhaustive search, these are the only ones I can find now.
  • Upgraded Huina 580/1580 main bearing assembly. I bought this.
  • OPTIONAL – Conformal Coating: this is like lacquer, a clear and hard-setting coat that protects PCB and electronics from water. This can often be found at your local hardware store. Generic/any brand is fine. Here’s an example.
  • OPTIONAL – Powered, tool-free bucket swap adapter (note, this will mean you’ll need a different bucket and won’t be able to use the original bucket, grabber and breaker unless you put the original H-bracket back on instead of this tool). I bought this one. (And here’s a non-powered one).
  • OPTIONAL – A more narrow bucket to suit the tool adapter, with the advantage that it also takes less effort to dig with, further increasing apparent strength – a good thing! I got this one. Alternatively (or as well), here is a Small Trench Bucket and here’s a Ripper. Both of these should be compatible with the new tool changer.
  • OPTIONAL – A driver! You can buy these guys in packs and can be civilian or military. I bought a pack of both for various 1:12, 1:14 and 1:16 models and they work reasonably well for all these scales. Here are the ones I got (not pictured in this article – they’re in other vehicles currently!).
Huina 1580 Upgrades

Getting’ It Done

Ok, we’ve got the tools, got the parts, and set aside the time. Let’s do this!

I started with the stick (the smaller arm that connects to the boom and the bucket). Remove the bucket and H bracket assembly. Put the screws in separate piles in order on your workspace so you can reassemble with some semblance of order! Remove the connecting bolt on the boom end and remove the linear actuator bolts also (from both the boom and the stick actuators).

You need to remove the yellow plastic hex bolt covers over the screw holes. Then, remove the Philips head screws within. I managed to damage a couple of my plastic covers while experimenting with ways to remove them without damage. Use something small and sharp, like needle-nose tweezers or a tiny jeweller’s flat screwdriver.

Huina 1580 Arm
Huina 1580 Arm Screws
Huina 1580 Actuators

Disassemble the Arms

After all screws are removed, the stick comes apart and you can see the internals. Note where the rubber grommets are located around the wires at each end – they’ll need to be aligned again when you put it all back together. At this point I like to take a close, clear photo of the internal state of everything. This creates a handy point of reference for when you’re reassembling from scratch, tomorrow after the conformal coating has set and you’ve forgotten the minor details!

Remove the original linear actuator, noting the orientation of the wires on their connection (not a huge deal if you mix them up on the new actuator, but it’d mean opposite direction to intended operation if you get it wrong). Remove the rest of the electronics in preparation for grinding.

Do the same for the boom (the main arm) or, if you’re confident you can be accurate with your grinding disc and drilling, you can keep everything in the boom apart from the actuator. You will need to remove everything if you plan on applying conformal coating to all boards.

New Actuator Placement

Drill Some Holes

Now it’s time to drill and grind. Look at the new actuators. See that hole in the middle? That needs to go through the pivot point on the faux bolts on the boom and stick. You’ll want to drill a 4mm hole on those bolt housings (not actually bolts, they just look like it from the outside) in the centre on each.

This needs to be done on both the smaller stick and the larger boom – four holes in total, left and right sides for each arm. Do them whilst they’re together or apart, whatever works best. Just try to get them centered! (Mine were a bit off – no problem, aside from the aesthetics if you’re looking closely).

Drill Some Holes pic

Time to Grind

Look at how the original actuators fit in the arms. See how they can pivot a little as they extend and contract? Note the shape of the new actuators and how they cannot pivot – this needs to be addressed. We need to grind out some of the internal structure of both arms so that the rectangular prisms of the actuators can pivot. I went by eye – maybe the below image will be helpful. I found I had to remove more material from the stick than from the boom. Be sure to vac or wipe the parts to ensure any loose metal is cleaned out.

Huina 1580 Grinding
Huina 1580 Grinding
Huina 1580 Grinding

Reassemble Those Arms

The arms can go back together now. Connecting everything is pretty straightforward – the only thing that can go either way is the connector on the new linear actuators. On my unit, ‘red to the right’ was what I noted. You should double check this by comparing the alignment of the original actuator’s connector or by checking the photos you took earlier. Also note that I found removing the bottom part of the connector (the socket side on the pins on the PCB) gave the new connectors a bit more of the pins to grab onto and sit lower onto the board.

When you go to press the sides back together, be careful to ensure your wires are routed safely and aren’t being pinched. Check the grommets align with the metal moulds and watch closely as you go to be sure it’s all just fitting. No great amount of force should be needed. For instance, if one side isn’t sitting flush, that’s a sign something internally has gotten in the way. Pull apart and try again rather than using brute force to get it done! Do up the screws and bolts in the opposite order and you’re done!

Huina 1580 Arm

Huina 1580 Bucket List

With the original bracket and bucket attachments removed, now is a perfect time to install the new remote tool attachment system. I found this was pretty simple and instructions weren’t missed for this step – but look closely at the picture below for alignment hints if you need. It all only goes together one way.

Huina 1580 Attachment

Body (Re)Building!

That’s the arm upgrades done! Now we want to get the main bearing installed. Whilst the body’s apart we’ll do the driver and conformal coating as well – see sections below for that.

To disassemble the Huina 1580 main body, you’ll want to have the battery and controller nearby. Some rotation may be needed to get the screwdriver onto every screw underneath. There are 6 screws but only 5 need to be undone to remove the cover. The 6th one is the one under the cabin – you will need to remove that to get the cabin out, but if you’re not putting a driver in, you can ignore this step.

Remove those screws and then the metal body should lift off. Pay attention to the two wires coming from the cover to the main PCB. These are the battery and smoke machine connectors. Unplug them from the mainboard and then set the heavy metal cover aside. No modification is needed to this part.

Huina 1580 Body Off
Huina 1580 Disassembly

Let’s Twist Again

We want to get to that main bearing. This means the PCB needs to come out. It also means the tracks need to come off so you can get access to the cover underneath the excavator. I’ve gone through this a couple of times by now. The easiest way to remove the Huina 1580’s tracks is to remove the screw on the driving wheel on each side. Then, compress the tracks on the other end (there’s a tensioner screw behind that main jockey wheel) and then slide the drive wheel off its axle. Be careful not to pinch your skin in-between the track parts!

Once the tracks are off, you’re in for a treat. The cover comes off with those Philips head screws you can see on the base. The special surprise is that you also need to remove every single one of the hex bolts and locknuts on the small jockey wheels, as they are part of the attachment between top and bottom parts of the undercarriage! It’s a bit of a pain, but with patience you’ll have it done soon enough.

Remove the bottom cover. After that, remove the main bearing bracket. Next, you need to drill out those holes to 6mm (compare your drill bit to the larger bolts that came with the new bearing to ensure you have the right size). Drill all 6 and then you can put the bearing in. The retention plate goes on the top of the bearing, which itself goes on the top side – the servo needs to reach the gears, so ensure you get this part right! No bolts are needed from the top side as it’s all done underneath. Only those six big bolts are on the underside. It should look like this when done (see below). Now reassemble the base and put the tracks back on in opposite order to disassembly steps above. I added a little grease around the main bearing cover when I placed it back onto the base.

Conformal Coating

If you’re waterproofing the PCBs on the Huina 1580, now is a great time to do the mainboard. I painted mine on in thin layers using the included brush that came with my bottle. I did it outside with good air circulation – this stuff is not good to breathe. A filtered mask is best but outside with a breeze or a fan would be a minimum. Don’t breathe it.
As you apply it, be careful to keep the coating off the connector pins. If you get it on these, the pins won’t work properly when you plug the wires back into them. Once it’s done, leave it in a breezy spot to dry. I’ve got a PC fan in a square of cardboard that I run like a little wind tunnel to promote setting for things like this, but just leaving it somewhere to set overnight should be enough.

Huina 1580 PCB
Huina 1580 PCB After

Driver for the Huina 1580

Whilst things are open, let’s get a driver installed! There are two screws at the base of the cab that need to come out, plus the larger screw underneath the base. Then it swings and lifts out. I used a little hot glue to secure my driver onto his seat and I had to cut his feet off at the ankles. In this case, it was a price he was willing to pay for scale! Then, the cab goes back together in the opposite order of disassembly.

Huina 1580 Driver

Reassemble All The Things

Okay, your conformal coating has set. Your driver is in and the arms are back together. Let’s get this digger back on its tracks!

Ensure there’s a fresh coating of grease on the main bearing gears, and that the whole assembly rotates freely. I added some light machine oil into the new bearing during this step and found it really helped the whole thing turn more easily. Your mileage may vary here, depending on the finish of your bearing (they are cheap items, after all). The plate goes on top and then the six smaller screws secure it in place.

Attach the arm back onto the base in the opposite order of disassembly. The rotation servo may need to go on first – I can’t recall which of these went in first, sorry, but it should be fairly obvious when you try this step. Once the arm and the rotation servo are in, along with the cab, you should have something that looks like this.

Finally, install the main PCB and then connect everything back up. Try to route your wires cleanly and use cable ties if you want to make it super neat. Just be sure that nothing will be pinched between body plates and that none of the connectors are under any tension from being pulled on by tight wires. It would be a good idea to power it up before you put the lid back on to check everything works – just be careful nothing shorts!

Bolt the cover back on from underneath and enjoy your stronger, weather-resistant and more scale Huina 1580. Happy excavating!


Huina 1580 at Work

 (Find other articles in our ‘RC Construction’ category, as they’re posted. Wheel loader, hydraulic excavator, hydraulic tipper trailer, bulldozer and more, coming in 2022).

Craig Veness

Craig Veness

RC-TNT

Craig has been into radio control since the 90s and into RC crawling since about 2010, when a Losi MRC started the obsession! Now it’s all rocks this and crawl that and upgrade all the things! …You know how it is, right? Welcome home 🙂