
How to Program the HobbyWing WP-1080 ESC
This is the HobbyWing WP-1080 ESC. It’s a hugely popular trail and rock crawling brushed Electronic Speed Controller (ESC) – and for good reason. Its waterproof, doesn’t require active cooling and has a quality 80A MOSFET array for reliable and consistent output. It also has a basic but solid set of programmable options. This speed controller has been reviewed extensively over the few years of its availability. The purpose of this article is to show you my own, well-tested profiles I’ve created for various types of crawler and trail rigs. (Incidentally, we have a great article on which RC rock crawler is best for you – check that out here if you haven’t already!)
About the WP-1080 ESC
The WP-1080 ESC user manual and full specs can be found on the HobbyWing website, hobbywingdirect.com.
For your average hobbyist with a 1/14, 1/12, 1/10 or even 1/8 scale crawler or trail rig, this ESC is a reliable and flexible workhorse and has a few luxury features. The WP-1080 may be found in budget-build competition rigs around the world also. The WP-1080 package includes a programming card. This lets you fine-tune your ride and even to change how the motor sounds – and that’s the good stuff we’re going to dive into here.
I’ve used the WP-1080 on many different rigs and have put days of testing into these profiles. Did I say profiles? Well, yes, but it isn’t quite the set-and-forget system you might find on more premium controllers, but as far as features-to-price goes, you can’t really beat the 1080.
Where to Buy the WP-1080 ESC
Buy your HobbyWing WP-1080 ESC here (AsiaTees affiliate link). A cheap and cheerful alternative (not programmable, but my #2 go-to) is the HobbyWing WP-1060 (AsiaTees affiliate link). These ESCs can also be found on AliExpress, Banggood, eBay, local hobby stores the world over, etc. They’re super popular, so finding one hopefully won’t be too difficult!

WP-1080 ESC Installation
First, here’s a quick installation tip for if you plan on changing between profiles. If your ESC is installed into a hard-to-reach place, or under a hard body that takes screws to undo and you want to avoid the hassle for a quick, trail-side change, you might consider putting a Futaba-type extension lead from the ESC to a secure and easy to reach location on the chassis somewhere. That way, you can just plug the card into the extension cable rather than having to reach all the way to the ESC.
A second tip would be to consider putting a main power switch on the power line – this way you won’t be slowly draining your LIPO over the day if you have the rig off between course attempts or trail runs.

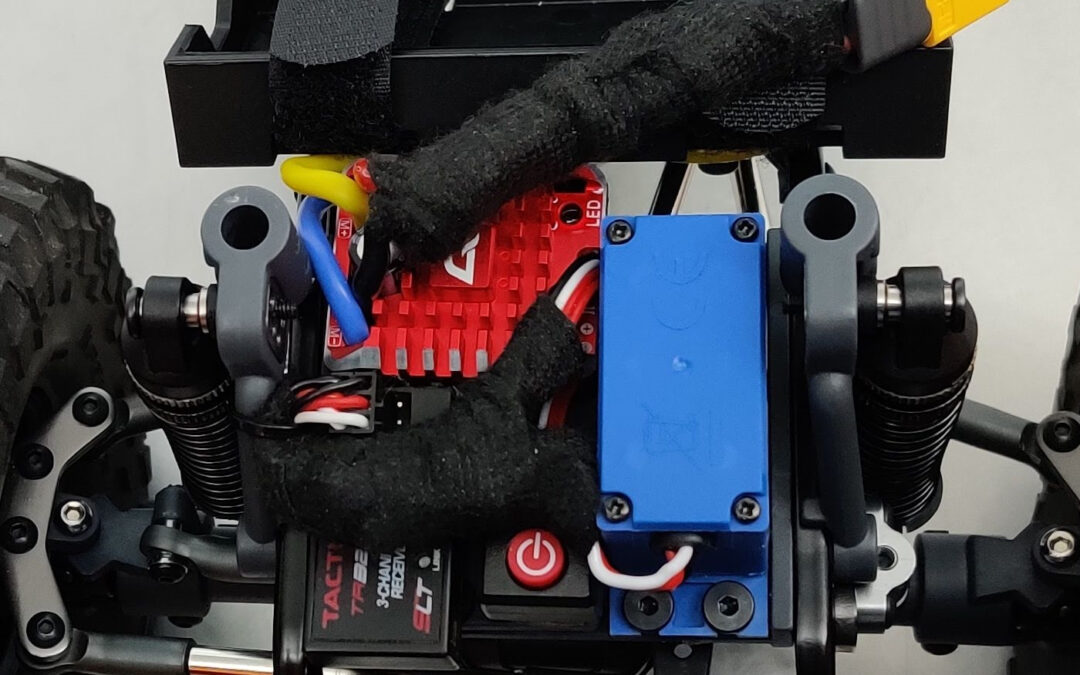
Connecting the Programming Card
In the box, the WP-1080 ESC comes with a programming card and a JST male-to-male 3-pin cable. This connects to the card on the right side – the card is marked with Signal, +ve and -ve. The cable also then connects to the 3 pins on the top of the WP-1080 ESC itself. Ensure you connect the same cable colors to the same icons on both the ESC and the card (signal to signal, + to + and – to -).
Then, connect a battery to the ESC and press the power button. The card’s LCD will light up if you’ve done it correctly. (If it doesn’t light up, you have a battery connection or charge issue, or an incorrectly connected card – check the photos here to be sure you’ve got it right).


WP-1080 ESC Profiles
I have a few setups here. I’ve suggested settings for both heavy and light rigs. This is because vehicle weight changes how the vehicle accelerates and especially how it brakes on steep terrain. I’ve also got a trail driving and a dedicated rock crawling profile. I’ve developed these settings myself on a TRX-4 hardbody crawler, a standard TRX-4 Bronco, an SCX10 II and a Vaterra Ascender. The TRX4 and SCX10 were lighter rigs and the hardbody TRX4 and Ascender were heavy, with brass upgrades down low.
I’d define a heavy rig as weighing more than 3.4kg (or 7.5lb). 3kg to 3.4kg (or 6.5lb to 7.5lb) is middling, and under 3kg is what I’d call a light rig. Scale crawlers get about as light as 2.4kg (5.3lb), but less than that and you’re really looking at competition crawlers, which aren’t the focus of this article.
We’ll go through each setting on the programming card, from #1 to #15. I’ll put the name of the function and the available options first, and then a description wherever its relevant. This way you’ll know what we’re adjusting at each stage and will have the knowledge and understanding to adjust to your liking once you’ve got the base profile set up on your vehicle.

1. Running Mode
(1) Fwd/Brk; (2) Fwd/Rev/Brk; (3) Fwd/Rev.
All vehicles: (3) Fwd/Rev
(Unless you want brakes, in which case select (2) Fwd/Rev/Brk)
For a crawler, you want (3) Fwd/Rev. For a trail rig, you might want (2) Fwd/Rev/Brk if you want braking before changing directions, but most people will prefer (3) Fwd/Rev for all crawler and trail truck types. Racetracks with brushed motor vehicles are a rarity these days (often the ‘Classic’ class), but if you are using this ESC on a racetrack rather than in a crawler, (1) Fwd/Brk is the only one you’d generally be allowed. That isn’t relevant to us though! Most of the time, (3) Fwd/Rev is the answer here.
2. Battery Type
(1) LiPo; (2) NiMH.
Set according to your battery type.
This basically gives you a lithium-polymer (‘LiPo’) low-voltage cut-off. The cut-off function protects your lithium battery from sustaining damage from over-discharge. Such a circuit isn’t needed for nickel metal-hydride (‘NiMH’) batteries. So, simply select the option for the battery chemistry you’re using: that’s LiPO, for most of us, or NiMH if not.
3. Cutoff Voltage
(1) Disabled; (2) Auto (Low); (3) Auto (Medium); (4) Auto (High).
All trucks: (2) Auto (Low)
(Or (3) according to personal preference. See explanation below).
If you selected (2) NiMH on Battery Type, this setting must be (1) Disabled. Otherwise, what you select here will be determined by your approach to managing your LiPOs. I’ve been using LiPOs for over a decade and have over 100 of them in many sizes. (2) Auto (Low) is fine in my opinion, as once you’re done with the rig the battery will go onto Storage charge when you’re done with it anyway.
Many folks have opinions on LiPO batteries and that includes me: I’ll just say that the individual cells can take the stress of hitting 2.5v and lower for short periods of time. The lower you go, the more you risk damaging the chemical balance in the cells. However, the ‘Low’ setting here is 3.0v so you’re going to see voltage sag to about 2.7v for brief periods with it on (2) Auto (Low), which is acceptable, in my opinion.
One caveat to my strategy: if you’re away from a charger for a while and won’t be able to put the battery on Storage for a few days, then go with (3) Auto (Medium) instead. This will be a bit kinder to your cells. Going with (4) Auto (High) actually cuts off at around storage charge, which is simply too high, IMO. I don’t think (4) Auto (High) is really ever needed unless you’re using a teeny, tiny battery of very low discharge potential; but in that case, it’d be the wrong kind of battery for a crawler anyway! So, ignore option (4) and go with (2) or (3) if you’re more comfortable.

4. Initial Start Force
(1) 0; (2) 2; (3) 4; (4) 8; (5) 10; (6) 12; (7) 14; (8) 16.
All profiles: (1) 0
This refers to the lowest amount of power the ESC will send to the motor. Lower numbers give more resolution, or finer control. Selecting option (1) gives maximum range of throttle input as allowed by your radio.
5. Max. Forward Force
(1) 25%; (2) 50%; (3) 75%; (4) 100%
All profiles: (4) 100%
You’ve got the power installed in your rig, you want access to it! You’d only use a lower setting if a young child was having a go, or if you had a specific use case, such as wanting greater low-speed resolution from your radio and you knew you wouldn’t be using more than 50% power. In such cases it would actually make sense to use option (2), for example.
6. Max. Reverse Force
(1) 25%; (2) 50%; (3) 75%; (4) 100%
All profiles: (4) 100%
Same as Max. Forward Force, you want access to the power! Some cheaper ESCs actually have less current capacity for Reverse, but the WP-1080 has full power on tap for both motor directions, so use it unless you have some specific reason not to.
7. Max. Brake Force
(1) 0%; (2) 12.5%; (3) 25%; (4) 37.5%; (5) 50%; (6) 62.5%; (7) 75%; (8) 87.5%; (9) 100%.
Ignore (unless Running Mode with Braking (#1 (1) or #1 (2)):
- Heavy and light crawlers: (9) 100%.
- Heavy trail trucks: (9) 100%.
- Light trail trucks: (7) 75%.
This option can be ignored unless you selected a Running Mode profile with Braking (Number 1, Option 1 or 2).
8. Initial Brake Force
(1) 0%; (2) 6.25%; (3) 12.5%; (4) 18.75%; (5) 25%; (6) 31.5%; (7) 37.5%; (8) 43.75%; (9) 50%.
Ignore (unless Running Mode with Braking (#1 (1) or #1 (2)):
- Heavy and light crawlers: (9) 50%.
- Heavy trail trucks: (9) 50%.
- Light trail trucks: (7) 37.5%.
This option can be ignored unless you selected a Running Mode profile with Braking (Number 1, Option 1 or 2).

9. Drag Brake
(1) 0%; (2) 5%; (3) 10%; (4) 50%; (5) 60%; (6) 70%; (7) 80%; (8) 90%; (9) 100%.
- Light trail trucks: (4) 50%
- Heavy trail trucks: (5) 60%
- Light crawlers: (7) 80%
- Heavy crawlers: (8) 90%
This is the power of the drag brake. 100% will (or at least, should) keep you stopped no matter the terrain grade, as long as your wheels have traction. If you have lower turn motors (21 or lower, let’s say), increase any of the below by 1 or 2 steps.
10. Drag Brake Rate
(1) Level 1; (2) L2; (3) L3; (4) L4; (5) L5; (6) L6; (7) L7; (8) L8; (9) L9.
- Light trail trucks: 2 (L2)
- Heavy trail truck: 3 (L3)
- Light rock crawlers: 6 (L6)
- Heavy crawlers: (7) (L7)
This is how rapidly the ESC progresses from zero throttle input to full drag brake power implementation. Number 1 is slow while number 9 is instant. For light trail trucks, you want it to roll to a stop and then hold you there. For heavier trail trucks, you’d bump it a little higher for more aggression to help slow the rig, without being too high that it stops the truck too abruptly.
Conversely, for crawlers you want a higher setting, as you’re not rolling to a stop on a trail so much as braking on steep ascents and descents. For light rock crawlers, you want a middling setting, a little higher if you have good throttle control. I’ve found (7) is too aggressive unless you’re super co-ordinated, as it’s easy to flip a lighter rig by accident. However, for heavier rigs, you do want the rate a bit higher. I’ve found even for the heavy stuff, (9) is too high, but experiment here with (7) and maybe (8) if you have very fine throttle control.
11. Neutral Range
(1) 0.02ms; (2) 0.03ms; (3) 0.04ms; (4) 0.05ms; (5) 0.06ms; (6) 0.07ms; (7) 0.08ms; (8) 0.10ms; (9) 0.12ms.
Default is fine: (4) 0.05ms
This relates to the ‘dead zone’ (null signal, no signal) range of your throttle. If you have a cheap transmitter OR if a new person (or child) is driving, widen the dead zone by selecting 8 or 9 (although this is better addressed on the radio, if you have expo, for example, flatten the curve for the first 25% or so, which will heavily dampen smaller inputs – also helpful if you have a tremor you can’t control).
12. Start Mode/Punch
(1) Level 1; (2) L2; (3) L3; (4) L4; (5) L5; (6) L6; (7) L7; (8) L8; (9) L9.
- Light trail trucks: 4
- Heavy trail trucks: 6
- Light crawlers: 8
- Heavy crawlers: 9
- Experienced Drivers/Personal Preference: 9
This artificially limits the initial current to the motor, smoothing the input for a less jerky start. It’s kind of like a very basic traction control. However, this takes control from you, so level 9 means it’s all you while level 1 means the ESC is interfering the most. It can be helpful for smoothing inputs on the trail, but not so much when precision crawling. I personally prefer the highest setting because there’s no layer of electronics between me and the machine.

13. PWM Frequency
(1) 1K; (2) 2K; (3) 4K; (4) 8K; (5) 16K.
- All trucks except heavy rock crawlers: (5) 16K.
- Heavy rock crawlers: (4) 8K.
Affects the switching speed of the FETs in the ESC. Lower settings mean less switching and more punch while higher settings mean smoother control and slightly less punch. Higher settings have the additional benefit of removing that annoying sound that brushed motors make under load at lower throttle positions, but the trade-off for the higher rate of switching is the FETs get hotter. The ESC can handle it though and I personally like Option 5 for all types except for heavy crawlers, where I go with option 4.
14. BEC Voltage
(1) 6V; (2) 7.4V.
Default: (1) 6V.
The WP-1080 has a 3A continuous (6A burst) BEC rating at 6V. That current rating will be marginally lower for 7.4V. Setting higher voltage is usually better, as long as your servo and associated radio gear can take it.
What I often do is run a separate BEC to the servo (because I have 8V or higher servos) and I leave the WP-1080 at 6V. This leaves the WP-1080 ESC BEC to run the Rx, lights, secondary servos, etc. OR if the servo is 7.4V and it isn’t a comp truck, set the WP-1080 ESC to (2) 7.4V and run any 6V devices via a separate 6V BEC.
I don’t have a truck type specific setting here because it depends on the configuration of your hardware more than the type of rig. Use your own judgement and if in doubt, go with (1) 6V until you know what you’re doing.
15. Freewheeling
(1) Enabled; (2) Disabled.
All crawlers: (1) Enable it.
This is a feature that applies your selected drag brake rate and strength to the motor even when you’re applying throttle. It takes your throttle input into account and then applies drag brake at the same time.
Simply put, this stops the motor going any faster than directed by your throttle input; it lets you drive down a slope without the vehicle gaining unwanted speed beyond the input you give it. Clever!

After Installation – Don’t Skip This Step!
One last thing: after installing the ESC, be sure to calibrate the throttle profile on your radio to the ESC. This is so the ESC gets 100% throttle when the radio is sending it – sometimes things can be a bit weird if you skip this step!
Here’s how you do it:
- Press and hold SET;
- Turn ESC on;
- Release SET button immediately when it beeps and the LED flashes;
- Leave throttle in neutral position and press SET (LED flashes once and beeps once);
- Hold full forward and press SET (LED flashes twice and motor beeps twice);
- Hold full reverse and press SET (LED flashes thrice and motor beeps thrice);
- Press power button to turn off, then turn on again. Test.
(Reverse channels on the radio if it doesn’t work correctly! Also ensure your throttle trim is zeroed before you begin).
WP-1080 ESC Troubleshooting
Problem: throttle behaving strangely; only has full reverse and no forward, or weirdly limited max throttle, etc.
Solution: recalibrate the throttle profile on your radio to the ESC – see the above step, ‘After Installation’.
Problem: rig still feels too jerky on acceleration.
Solution: lower your start punch. Test. If problem remains, try increasing your Initial Start Force by a step. Test and repeat until happy.
Problem: rig brakes too jerkily with no throttle input.
Solution: lower your Drag Brake Rate by a level or two. Test. Repeat and lower again until happy.
Problem: there isn’t enough info in this article!
Solution: find the HobbyWing manual and customer support here.


Craig Veness
RC-TNT
Craig has been into radio control since the 90s and into RC crawling since about 2010, when a Losi MRC started the obsession! Now it's all rocks this and crawl that and upgrade all the things! ...You know how it is, right? Welcome home 🙂